Whew! So it's finally finished. After two weeks of working very carefully on this thing, I think I can finally call it finished. I have so many things to be pleased about.
First, I got it finished and it looks beautiful, inside and out. Second, it fits. A little too well perhaps, for there is very little room for Daughter to grow. On the other hand, that means I get to make another one next year. Third, I finished it in time to enter it into the Pattern Review Sewing for Children contest. After missing the deadline for the LBD contest, this is a big deal to me. And fourth and most important, Daughter loves it. I say again. I am pleased.
Let's start with the pattern. This is a Burda magazine pattern, 12/2012 #156. I downloaded it from the BurdaStyle site, taped all the pages together, and ended up with the awesomest little girl coat pattern ever. Never mind that I had to add seam allowances. It's a great pattern.
Burda suggests wool tweed with velvet collar and piping. I did mine in a wool plain weave flannel that I bought from Miss Fairchild of Pattern Review either earlier this year or last year. I used three different fabrics: a rose, a gray, and a plaid. All pretty much the same weight, though the plaid is a touch lighter than the other two. It's lined with a spruce green polyester silky fabric bought from JoAnn's as stash lining fabric God-only-knows when.
The instructions, like all Burda instructions, were vaguely incomprehensible. After reading through them once, I decided logic would have to serve me well on this project. Having never made a coat quite like this before, it's a good thing I learned logic while learning how to write in Java and C++. Because I had to logic my way through the Whole. Darn. Thing.
The first thing I love about this pattern is the pockets, complete with pocket flaps. No fake pockets for my Daughter, these are the real deal. Set into the waist seam, the pockets should have been easy. I had to make three tries, though, to get them in just right. I'm glad I kept working at it because in the end they turned out beautifully.

Getting the piping (it's not actually real piping because it has no cord but I'm gong to call it piping anyway) to curve around the edges of the pocket flaps was a real challenge, but add some steam and heat to wool fabric and it's putty in your hands, so to speak.
And I think the idea of two-piece sleeves in a little girl's coat is just plain cool. So grown up and everything. I doubt Daughter cares that her coat has two-piece sleeves, but I positively adore it. The sleeves gave me a bit of trouble, too, as I didn't realize until I had fought to line up the sleeve cap, decided it was a lost cause, and bound the whole thing that the side seam was
not supposed to match up with the sleeve seam. Duh.
Did I mention that I bound all the seam allowances. Every last one, excepting the pockets (which on second thought maybe I should have) and the seam joining the fabric to the lining. I simply cut some pretty quilting cotton I had lying around, folded and pressed it into binding and sewed it on all the seam allowances. It's not even bias cut, just straight grain. Didn't matter, since I didn't need any stretch anyway.
Binding the waist seam did give me a bit of trouble with all that bulk when I tried to put the bottom buttonhole in. I ended up having to scrunch it out of the way while still keeping the facing in place to sew the buttonhole. That was tense, but I got it in the end.
I also bound the facing edges. I always like to see bound facings whenever it's practical.
And the back has this nice pleat which increases the bottom width for active girls who like to run around on the playground.
I got these really cool buttons at JoAnn's last year. I love metal buttons, so I grab the classy ones whenever I see them. Daughter picked these out of many to choose from.
And the hems got a semi-decorative stitch for the binding, but I hand sewed the hem in place. I used Steam-a-Seam first to keep the darn thing in place before I stitched. Marvelous stuff, that Steam-a-Seam. I've got to remember to use it more often.
So I had this thing all finished a couple of days ago when Daughter mentioned she'd like to wear her purple leopard print jacket with the hood underneath it. Um, leopard print and plaid? I don't think so. Turns out she just wanted to have the hood. So I sorted through my trusty pattern collection until I found a hood that I thought would work. New Look 6853 has long been out of print, I think, but I used this pattern for Youngest Son's pants for a long time. There is a jacket pattern in there too, and whaddayaknow, it has a hood.
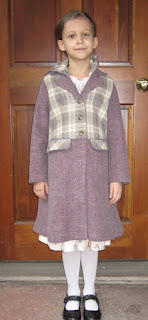
So I used this pattern to create a hood in the plaid fabric that sits under the collar.

The hood buttons on and off. The only problem is the buttons catch on her braid. I'm thinking I can make another hood in the gray fabric I used for the piping. Maybe I could make a placket that covers the buttons. And then Daughter could change her hood to suit her mood. I wonder if she'd like that idea?
So there it is. This is a great pattern. Everything goes together beautifully and even the sleeve cap wasn't hard to ease into the armscye. It was alot of work. And worth every minute. I look forward to doing it again next year.


 The hood buttons on and off. The only problem is the buttons catch on her braid. I'm thinking I can make another hood in the gray fabric I used for the piping. Maybe I could make a placket that covers the buttons. And then Daughter could change her hood to suit her mood. I wonder if she'd like that idea?

 The lining went together pretty easily. Daughter picked this spruce
color, which has absolutely nothing to do with the colors of the coat
but seems to go with it well enough.
The lining went together pretty easily. Daughter picked this spruce
color, which has absolutely nothing to do with the colors of the coat
but seems to go with it well enough. 
