So apparently footwear is the name of the game these past couple of weeks. First socks, now slippers. These are pretty awesome slippers, though, and once your pattern is all set they take less than an hour to make. What could be better than that?
The pattern I got from the Burda Style website -- the Dorothy Ballerina slippers. And it's free. Unfortunately, they only come in one size so unless you're making a women's 8, you'll have to do some adjusting -- which isn't really that hard. Especially if you use fleece, like I did. The pattern is supposed to be for wovens, but since I never follow the rules, I didn't do that.
I made these for Daughter, so they're a girls size 1 1/2 or thereabouts.
To adjust the pattern, I printed out the pdf and had her stand on the sole pattern piece with her toes about 3/8" (for seam allowance) away from the front. Then I traced around her heel to get the proper size for the sole.
For the upper, I cut out the pattern piece, laid it across the top of her foot (again leaving about 3/8" for seam allowance), and brought the ends around to the back of her foot and estimated how much to cut off so that it would fit snugly at the back but not be too tight.
All very unscientific, but it worked beautifully. I made one quick muslin that fit perfectly from front to back, but I found that the sole piece was a bit too wide, so I narrowed that up a bit and cut out the pieces for the real version.
I made the soles in two layers: the inside is the fleece, for fuzzy warm coziness, and the outside is leather deerskin suede for non-slippiness and durability. I got to break out my treadle machine for the leather sewing, Yippeee!! I keep a leather needle in the treadle machine, as that is pretty much all I use it for these days. I don't really have the space to keep it out all the time -- my regular machine sits on top of the closed treadle cabinet.
After stitching the center back seams of the uppers right sides together, I used the treadle to stitch the soles to the uppers. Then, going back to my regular machine, I zigzagged a piece of 1/4" elastic to the foot opening stretching ever so slightly. Then I folded over to the inside and zigzagged again, for a nice clean finish around the foot opening. Voila! All done. That's why it takes less than an hour. There's just not much to it.
The first pair I made of these was done in a brown fleece with these ugly flowers embroidered on in wool yarn. Not sure why I bought that piece, except that maybe it was really cheap. The funny thing is, Daughter really liked the slippers, so she didn't mind the ugly flowers until I could make her a better pair. Preferably in pink. I didn't have any pink fleece, so we compromised with blue for the time being. So here's the blue pair. I'm sure she'll be happy to model them later.
Showing posts with label leather. Show all posts
Sunday, November 10, 2013
Sunday, February 5, 2012
PR Menswear Contest Day 5 and a New Project
Almost finished with my son's shirt. All that's left is to sew the buttonholes and sew on the buttons. Five days from beginning to end is not bad. Not bad at all.
What I'd like to make next is this coat from Orvis. I just bought some awesome 50%wool/50% acrylic olive green suiting from Fabric.com (sadly out of stock, but I got 10 yards, woo hoo!) that is perfect for this jacket. I also have a stock of leather scraps in a couple different shades of brown, so I should have all the supplies on hand. What I haven't been able to locate are those cool bone buttons -- I'm probably going to have to compromise on those.
I have two Burda patterns that I'm going to morph into this jacket. Burda 7704 and Burda 8186.
I'll use 7704 for the collar (which I'm going to have to widen and shorten) and the patch pocket placement (and therefore the seam which I think those front pockets are sewn into).
And I'll use 8186 for the breast pocket placement (and therefore the placement of the leather shoulder patches), the bottom front hem and the back vent.
There's no back view of this jacket on the Orvis website, but it looks like there's a back yoke as well. For that part, I'm going to have to wing it.
I'm not sewing this coat for the Men's Wear contest -- I really don't think that 10 days is nearly enough time to tweak the patterns, make the muslin, and sew the coat. Well, not without completely ignoring the rest of my life, anyway. But, of course if by some miracle it does get done before the deadline, well...
I washed the wool today, and it is now hanging to dry. So it's on to finishing the shirt. I've reviewed this shirt already, so then it's just a matter of taking a pic, editing my review, and submitting the entry to the contest. Yay! I actually did it!
What I'd like to make next is this coat from Orvis. I just bought some awesome 50%wool/50% acrylic olive green suiting from Fabric.com (sadly out of stock, but I got 10 yards, woo hoo!) that is perfect for this jacket. I also have a stock of leather scraps in a couple different shades of brown, so I should have all the supplies on hand. What I haven't been able to locate are those cool bone buttons -- I'm probably going to have to compromise on those.
I have two Burda patterns that I'm going to morph into this jacket. Burda 7704 and Burda 8186.
I'll use 7704 for the collar (which I'm going to have to widen and shorten) and the patch pocket placement (and therefore the seam which I think those front pockets are sewn into).
And I'll use 8186 for the breast pocket placement (and therefore the placement of the leather shoulder patches), the bottom front hem and the back vent.
There's no back view of this jacket on the Orvis website, but it looks like there's a back yoke as well. For that part, I'm going to have to wing it.
I'm not sewing this coat for the Men's Wear contest -- I really don't think that 10 days is nearly enough time to tweak the patterns, make the muslin, and sew the coat. Well, not without completely ignoring the rest of my life, anyway. But, of course if by some miracle it does get done before the deadline, well...
I washed the wool today, and it is now hanging to dry. So it's on to finishing the shirt. I've reviewed this shirt already, so then it's just a matter of taking a pic, editing my review, and submitting the entry to the contest. Yay! I actually did it!
Tuesday, December 6, 2011
Friday Night Sew-In -- Leatherworking project
Pop on over and sign up for the Friday Night Sew In this week. I'm looking forward to it, that's for sure.
First of all, I need to drive to JoAnn's for the start of their weekend sale on Friday morning. I'd like a few Burda's (which rarely go on sale), a few notions (like size 18 needles), and perhaps a replacement for my troubled iron, which is going to take at least 6 weeks to send it out for repair and get it back (but will only cost me shipping one way).
I'd like to finish up my volunteer sewing for SewMuchComfort first, which ought to take all of 15 minutes. The only reason it's not already done is that I need to pick up a piece of velcro from the aforementioned fabic store.
Then, I'm hoping to fire up the treadle machine (okay, too much steampunk there -- all I really have to do is engage the belt -- but "fire up" sounds so much more interesting than "engage the belt") and make a corset type belt out of a piece of really beautiful black leather I bought from FabricMart last year (I think). It's garment weight, so I'll either have to line it with leather or a heavyweight twill to give it enough body to make a good belt.
I like these rather plain buckles that I ordered from a seller on Etsy and I'm thinking I'd like to fasten it with 2 or maybe 3 buckles. I have some fancier buckles, too, but I've noticed that I usually tend to pick plain and functional over fancy and delicate. Who knows? I might change my mind between now and Friday. Sheesh. I might change my mind halfway through the project. It's certainly happened before :o/
In any event, I've always thought those wide belts were really cool and I can't wait to make one for myself.
Sunday, December 4, 2011
Progress on the Leather Cap -- Finished!
This one's not fully lined, only the hat band is lined. It worked so well for the previous version that I decided not to fix what isn't broken. I did, however, bind the seam allowance at the seam where the hat band is joined to the sides. My treadle machine sewed beautifully through all those layers and it gives the cap a finished appearance on the inside.
All in all, it was a surprisingly quick project, and it turned out very nice indeed.
Thursday, December 1, 2011
Progress on the Leather Cap Part 2
Today's status report: Very Close To Being Finished
Last night I was able to stitch the visor and work the plastic stiffener into it. Then I stretched the leather tight, clipped it all in place, and left it overnight to settle.
This makes it easier to sew as the leather will conform (sort of) to the position it's been clipped into.
I also stitched the crown to the side pieces last night. There are two side pieces -- something I wish could be otherwise but to cut it as a single piece would take a fairly large piece of leather.
Today, I took on the scariest part: stitching the visor to the hat band. This is the part of the operation that is the most difficult and the least forgiving. You must stitch the curved visor, with its plastic insert, to the straight hat band -- sandwiched between the leather outer piece and its cotton twill liner. And of course, in leather, you only get one chance at it.
It went so well, I decided to keep going.
I attached the hat band to the hat sides and, really, the thing is all finished. As I type, I am waiting for my iron to heat up so I can bind the inner seam where the twill tends to fray and get kind of messy
Pictures hopefully tomorrow as this hat really looks its best on a model and it definitely doesn't fit little me :o)
Last night I was able to stitch the visor and work the plastic stiffener into it. Then I stretched the leather tight, clipped it all in place, and left it overnight to settle.
This makes it easier to sew as the leather will conform (sort of) to the position it's been clipped into.
I also stitched the crown to the side pieces last night. There are two side pieces -- something I wish could be otherwise but to cut it as a single piece would take a fairly large piece of leather.
Today, I took on the scariest part: stitching the visor to the hat band. This is the part of the operation that is the most difficult and the least forgiving. You must stitch the curved visor, with its plastic insert, to the straight hat band -- sandwiched between the leather outer piece and its cotton twill liner. And of course, in leather, you only get one chance at it.
It went so well, I decided to keep going.
I attached the hat band to the hat sides and, really, the thing is all finished. As I type, I am waiting for my iron to heat up so I can bind the inner seam where the twill tends to fray and get kind of messy
Pictures hopefully tomorrow as this hat really looks its best on a model and it definitely doesn't fit little me :o)
Wednesday, November 30, 2011
Progress on the Leather Cap
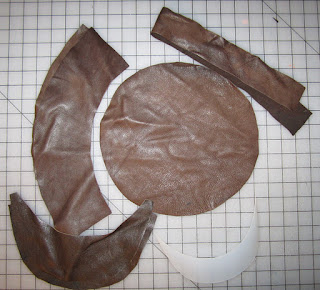
I pulled out my leather today and chose the appropriate skins for the Leather Cap. The visor is made of a walnut colored leather, slightly shinier than the leather I used for the body of the cap, and reinforced with the plastic from a large empty jug. I'd really like to get some pre-made plastic visors one of these days, but they tend to be too large and difficult to cut -- scaling them down is quite a project and one I'm not up to right now.
The other leather is of a slightly heavier weight and has more of a distressed finish -- not shiny at all. It is an interesting combination.
I need to cut a hat band for the inside, yet, and possibly a lining as well. I'll use plain brown twill for the inside hat band and, well, I haven't decided about the lining yet. I won't need it for a while so I have time to think about how I want to do that.
I put a leather needle in my treadle machine and threaded it up with some buttonhole twist. Man, oh, man, this machine sews beautiful stitches. As a test, I sewed myself a nice little leather case for my camera. Didn't turn out too badly, considering that I was running the machine through its paces. Had to get my husband to tighten the belt a little, but other than that, all was well.
Tonight I'm going to turn on some music and try to make a little more progress on this project.
The other leather is of a slightly heavier weight and has more of a distressed finish -- not shiny at all. It is an interesting combination.
I need to cut a hat band for the inside, yet, and possibly a lining as well. I'll use plain brown twill for the inside hat band and, well, I haven't decided about the lining yet. I won't need it for a while so I have time to think about how I want to do that.
I put a leather needle in my treadle machine and threaded it up with some buttonhole twist. Man, oh, man, this machine sews beautiful stitches. As a test, I sewed myself a nice little leather case for my camera. Didn't turn out too badly, considering that I was running the machine through its paces. Had to get my husband to tighten the belt a little, but other than that, all was well.
Tonight I'm going to turn on some music and try to make a little more progress on this project.
Tuesday, November 29, 2011
Next Up -- Leatherworking Projects
First up is a hat for my son that I adapted from Vogue 8309 (I believe it's now out of print). I made this one already a couple of years ago, but that one has since gotten lost (or at least misplaced) and a request has been issued for a new one. You can read about the adventure I had sewing the first one at this review on PatternReview.com.
I'm expecting the second copy to go alot better. Experience plus a sewing machine that is better equipped to handle the challenge gives me a feeling of confidence that I hope isn't misplaced.
Here's the inspiration. The character Amsterdam from Scorsese's 2002 film, Gangs of New York wears a modified newsboy cap for much of the film.
Very cool.
Here's the one I made in 2008. We chose a somewhat darker leather than the film version for the top of the hat and a walnut dyed leather for the visor. I still have enough leather and the pattern, so with any luck, making a duplicate should be a fairly straight forward project.
Famous last words ;o)
I'm expecting the second copy to go alot better. Experience plus a sewing machine that is better equipped to handle the challenge gives me a feeling of confidence that I hope isn't misplaced.
| Daniel Day Lewis as Bill "the Butcher" Cutter and Leonardo DiCaprio as Amsterdam Vallon in the 2002 film "Gangs of New York directed by Martin Scorsese |
Very cool.
Here's the one I made in 2008. We chose a somewhat darker leather than the film version for the top of the hat and a walnut dyed leather for the visor. I still have enough leather and the pattern, so with any luck, making a duplicate should be a fairly straight forward project.
Famous last words ;o)
Subscribe to:
Posts (Atom)