There is nothing -- and I mean nothing -- worse than making a dress shirt only to discover that the buttonholes start to unravel after the first couple of washings. Well, okay, maybe there are lots of things worse than that, but you all know what I mean.
I've made lots of shirts for Jordan. I've never felt like I had to do anything special to secure the threads of the buttonholes because I've never actually had one come undone. Until now. It's those black shirts with the woven herringbone pattern.
They wrinkle, too. Horribly. But I digress.
I can fix the buttonholes. It's not a fun task, at least not to me, but I can do it. I'd much rather do the buttonholes right the first time.
I know lots of people use fray check, but I've never liked using fray check in buttonholes -- I just don't like fray check, I guess. It's scratchy. I don't like scratchy things. So I thought I'd shoot for another solution.
When I made the olive green shirt out of this fabric, I tried pulling the top thread to the underside -- you can do this if you gently tug the bobbin thread and then grab the loop that forms -- and knotting the two together. This holds the threads of the buttonhole together so that it can't unravel. The only trouble was that there was these two little thread tails on every single buttonhole.
On the next shirt, I took those thread tails, threaded them onto a needle, and ran them under the stitches of the buttonhole on the underside for a quarter inch or so, and then clipped them.
Now the threads are secure and it looks good on the inside, too.
Showing posts with label tip. Show all posts
Friday, May 25, 2012
Tuesday, November 8, 2011
Whole Lotta Organizin'
Not much sewing the past couple of days, but a whole lot of organizing going on. I finally got my beautiful new/old Kenmore and my beloved Singer treadle upstairs to my sewing room so I can actually start cleaning and using them. I've got a new belt for the treadle and new bobbins for both, so I should be in business soon :o)
Of course all that involved cleaning out the drawers of my old sewing desk and moving everything to the new cabinets. Which means I filled a garbage bag full of things I had stored away that were absolutely worthless. Like that two inches of elastic I just had to save. Sheesh. What was I thinking?
Anyway, I decided to take advantage of all these pictures I take for the blog to help organize my patterns. Ever wonder what you made with any particular pattern? Me too.
I usually put all my pattern tracings in a separate envelope from the original. Mostly because the original pattern envelopes are stuffed full already and adding a tracing tends to mangle the tissue paper. Or maybe I'm just not careful enough :-) For whatever reason, my pattern tracings live in small manila envelopes.
I went ahead and printed a picture of each of the things I made lately, cut them out, and glued them to whichever envelope holds the tracing. Now I can tell at a glance what I made with each pattern.
If it works for pattern companies, why can't it work for me?
Of course all that involved cleaning out the drawers of my old sewing desk and moving everything to the new cabinets. Which means I filled a garbage bag full of things I had stored away that were absolutely worthless. Like that two inches of elastic I just had to save. Sheesh. What was I thinking?
Anyway, I decided to take advantage of all these pictures I take for the blog to help organize my patterns. Ever wonder what you made with any particular pattern? Me too.
I usually put all my pattern tracings in a separate envelope from the original. Mostly because the original pattern envelopes are stuffed full already and adding a tracing tends to mangle the tissue paper. Or maybe I'm just not careful enough :-) For whatever reason, my pattern tracings live in small manila envelopes.
I went ahead and printed a picture of each of the things I made lately, cut them out, and glued them to whichever envelope holds the tracing. Now I can tell at a glance what I made with each pattern.
If it works for pattern companies, why can't it work for me?
Tuesday, October 25, 2011
Tracing Tissue Paper Patterns
So I would like to make myself a fall jacket. I have a nice embroidered wool blend that I got at JoAnn's of all places and a Butterick pattern that I think will look great in this fabric. And I always trace my patterns since it seems like the ones I like best invariably go out of print before I'm really done with them.
Grrrr. I hate tracing patterns that are printed on tissue paper. Once I lay my tracing paper over the top, the lines practically disappear.
Poster board to the rescue! If you first put down a piece of white poster board, then the pattern tissue, then your tracing paper, the lines are so much easier to see and trace. By no means are they as easy as Kwik Sew or Jalie or any other pattern printed on real paper. But easier.
This jacket has 13 pattern pieces. Remind me to breathe.
And remind me to hang up the poster board when I'm done. I punch a hole in mine and hang it on the wall. That way it never gets mangled or beat up and is always handy at tracing time.
Grrrr. I hate tracing patterns that are printed on tissue paper. Once I lay my tracing paper over the top, the lines practically disappear.
Poster board to the rescue! If you first put down a piece of white poster board, then the pattern tissue, then your tracing paper, the lines are so much easier to see and trace. By no means are they as easy as Kwik Sew or Jalie or any other pattern printed on real paper. But easier.
This jacket has 13 pattern pieces. Remind me to breathe.
And remind me to hang up the poster board when I'm done. I punch a hole in mine and hang it on the wall. That way it never gets mangled or beat up and is always handy at tracing time.
Saturday, August 27, 2011
Practical Sewing and Hurricane Delay
I had planned to make the Fringe Festival top this past weekend, but practical sewing got in my way. It seems that Mother Nature decided to give us a cooler late summer this year, so I started making fall clothes for the kids. Instead of cutting out my own top, I ended up spending my sewing time cutting out some long sleeve tees for my youngest son.
I use Kwik Sew 2894 to make kids' raglan tees. I've been using this pattern for quite some time and I'm always pleased with the results. The only thing that I have to change is that I always, no matter the size, shorten the pattern piece for the neckline ribbing. Usually it's just 1/4 inch or so (for a full 1/2 inch shorter neckline binding), but sometimes it's a hair more. I found that this makes the neckline binding lay flat against the neck and is much less likely to stretch out with time.
Assembly line style, I cut out one of brown organic jersey, one of slate blue jersey, one of slate blue and navy striped jersey, one that I color blocked using the two blues, and one of green and brown camouflage in thermal knit. I have lots of different ribbing in my stash, so it's usually just a matter of picking the one that's the closest color match or using a contrast color for a "ringer tee".
When it came time for sewing, I sewed the camo and the brown first and then changed serger thread for the three blue ones. Four shirts with only a single thread change. I love efficiency.
But wait! That's only four. What happened to the fifth one?
Naturally, I discovered (after putting all the fabric and pattern pieces away, of course) that for the blue jersey I cut out two shirt fronts instead of a front and a back--it couldn't be two backs, couldn't it? Where I could just recut the neckline? Noooo. It had to be two fronts. So now I will need to pull out the leftover blue jersey and cut another shirt back. And since I hate wasting cut pattern pieces, I will have to cut another back and sleeves to use up that spare front. Not very efficient. I'm afraid the two cancel each other out.
But it will be six shirts with only one thread change. That's not so bad. And my son will have all the shirts he needs for a while.
Mother Nature also decided to send a hurricane our way...or perhaps by the time it gets to my little corner of New England it will simply be a tropical storm or a tropical depression. I am expecting the electricity to be out for at least a little while, but if it isn't, I'm hoping to get that Fringe Festival top cut out tomorrow. I don't (yet) have a treadle machine, though I learned (a million years ago it must be now) how to sew on one. When I have a bigger sewing space, I expect to put one in the place of honor just as soon as I can get my greedy little paws on a old Singer like my mother's. So the electricity can go out all it wants...I'll still be able to sew.
I use Kwik Sew 2894 to make kids' raglan tees. I've been using this pattern for quite some time and I'm always pleased with the results. The only thing that I have to change is that I always, no matter the size, shorten the pattern piece for the neckline ribbing. Usually it's just 1/4 inch or so (for a full 1/2 inch shorter neckline binding), but sometimes it's a hair more. I found that this makes the neckline binding lay flat against the neck and is much less likely to stretch out with time.
Assembly line style, I cut out one of brown organic jersey, one of slate blue jersey, one of slate blue and navy striped jersey, one that I color blocked using the two blues, and one of green and brown camouflage in thermal knit. I have lots of different ribbing in my stash, so it's usually just a matter of picking the one that's the closest color match or using a contrast color for a "ringer tee".
When it came time for sewing, I sewed the camo and the brown first and then changed serger thread for the three blue ones. Four shirts with only a single thread change. I love efficiency.
But wait! That's only four. What happened to the fifth one?
Naturally, I discovered (after putting all the fabric and pattern pieces away, of course) that for the blue jersey I cut out two shirt fronts instead of a front and a back--it couldn't be two backs, couldn't it? Where I could just recut the neckline? Noooo. It had to be two fronts. So now I will need to pull out the leftover blue jersey and cut another shirt back. And since I hate wasting cut pattern pieces, I will have to cut another back and sleeves to use up that spare front. Not very efficient. I'm afraid the two cancel each other out.
But it will be six shirts with only one thread change. That's not so bad. And my son will have all the shirts he needs for a while.
Mother Nature also decided to send a hurricane our way...or perhaps by the time it gets to my little corner of New England it will simply be a tropical storm or a tropical depression. I am expecting the electricity to be out for at least a little while, but if it isn't, I'm hoping to get that Fringe Festival top cut out tomorrow. I don't (yet) have a treadle machine, though I learned (a million years ago it must be now) how to sew on one. When I have a bigger sewing space, I expect to put one in the place of honor just as soon as I can get my greedy little paws on a old Singer like my mother's. So the electricity can go out all it wants...I'll still be able to sew.
Thursday, May 26, 2011
Align the Edges of Shirt Cuffs and Collars
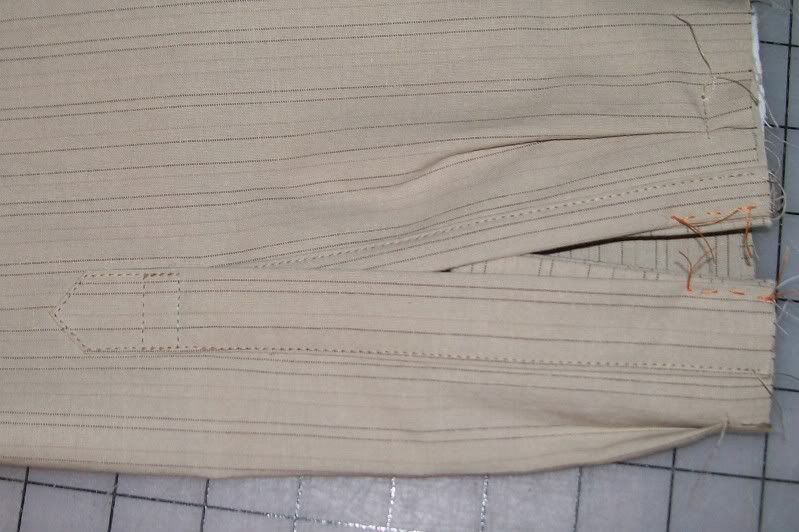
To align the edges of the shirt cuff and sleeve placket, try basting the cuff to the placket along the edge perpendicular to the seam you are about to sew. This keeps the cuff in place when you sew the cuff to the sleeve, whether by machine, by hand, or for basting.
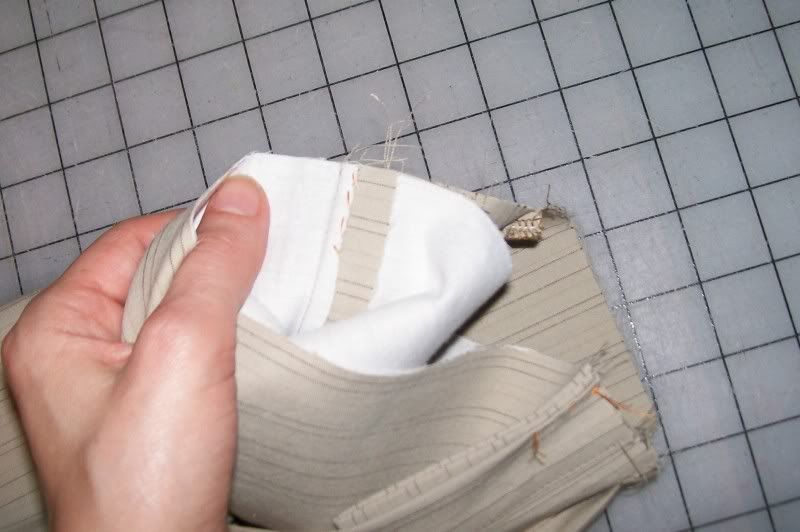
On the inside of the cuff, make sure when you baste that you catch the seam allowance and sew it flat so that you don't get any weird bumps.
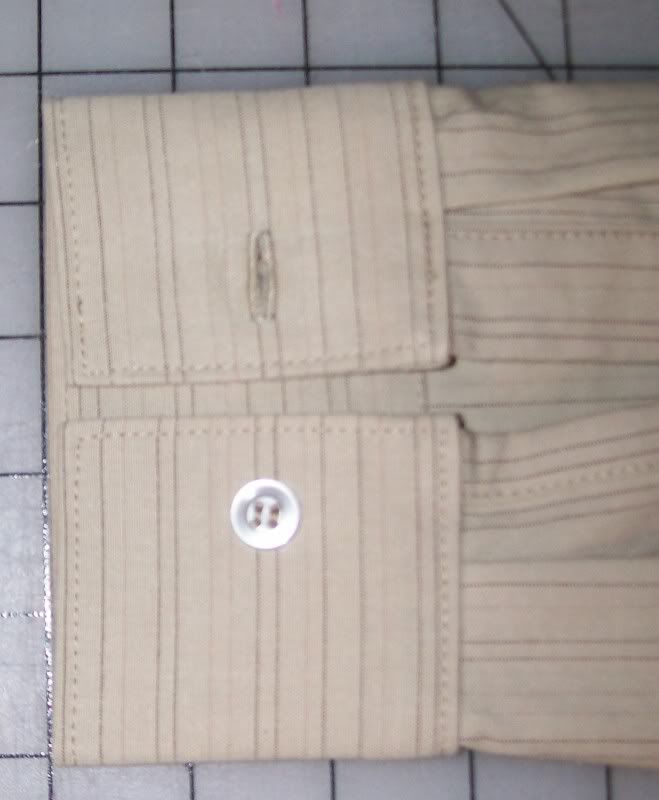
Voila. Nicely aligned cuffs!
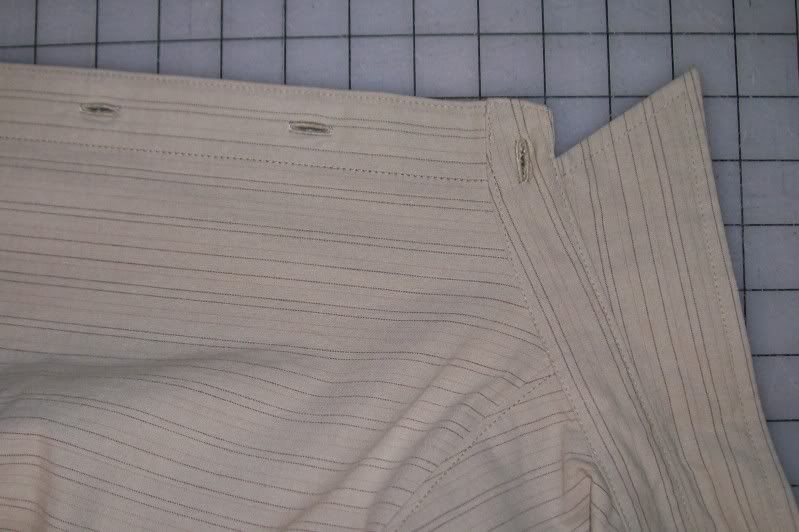
This works for collar stands, too.
Saturday, May 14, 2011
Serging Long Seams in Knits
I don't often pin baste any kind of seam before stitching except the loooooong ones. Like in this knit maxi dress. This has armhole princess seams in both front and back--making six long seams that have to be sewn just right.
The first thing I do is lay the first two pieces, right sides together along the seam line on my cutting table. I like to start with sewing center front to one of the side fronts. If I cut my pattern pieces correctly, they should match up between the lowest notch at the bust and the hemline.
If they don't, I have to pull out the paper pattern and find out what went wrong. Sometimes the paper pattern shifted during cutting and I didn't notice, sometimes there are errors in the pattern draft itself, and sometimes I have no idea what happened.
In a dress like this, it's usually possible to trim away the excess from the hem, as long as the bust notch, the waist curve and the hip curve match up properly. If they don't, you'll have to recut the pattern piece. That's why it's such a good idea to check the pattern pieces before you start.
You should not stretch your dress pieces on a long seam like this to get them to match. Ever. Stretching either one will make your long seams ripply and, to be honest, look pretty ugly.
Once you have the pattern pieces lined up at the seams, place one pin at the under bust notch and one pin at the hemline. Find an approximate halfway point--move up from the skirt hem, keeping the two pattern piece seam lines lined up and lying smoothly--and place one pin there. This is the minimum number of pins for a long seam. I like to use two more--one at each halfway point between the middle and end pins.
Next, I line up the notches above the bust and pin. Since these two curves go in different directions for bust shaping, your seam line won't match up here and you may have to do a bit of stretching in this area--that's okay since the fabric is going to stretch over your bust there anyway.
It seems like it might save time to pin all the pieces together and then sit at the machine and sew. You can try this if you like, but I've always found that I get stabbed by the pins in the seams I'm not working on and everything kind of gets all tangled up. I prefer to pin one seam and then sew it.
Starting from the armhole, slowly sew to before the first notch. DO NOT STITCH OVER THE PIN!!! You can do some major damage to the knives of your serger, not to mention knocking out the timing or breaking a looper if you run pins through your machine. Remove the pin and continue stitching. You may have to stretch to get the fabric to lie smooth at these opposing curves. Make sure the edges of the fabric line up with one another--sew slowly and take your time. Once you've trimmed the seam allowance, you can't put it back, so make sure you only trim off what's allowed. Remove the pin at the lower bust notch.
Hold the fabric at the next pin in your left hand. Pull it toward you so that it is smooth but not taut. Use your right hand to line up the fabric edges and to guide the fabric through the machine. Do this in stages--at each pin, reposition your hands and use both of them to guide the fabric through the machine. DON'T STRETCH!
Repeat this with the remaining seams and start all the seams from the top of the garment. Directional sewing (sewing all seams going in the same direction) really does matter.
And after the seams are all sewn, don't forget to press.
The first thing I do is lay the first two pieces, right sides together along the seam line on my cutting table. I like to start with sewing center front to one of the side fronts. If I cut my pattern pieces correctly, they should match up between the lowest notch at the bust and the hemline.
If they don't, I have to pull out the paper pattern and find out what went wrong. Sometimes the paper pattern shifted during cutting and I didn't notice, sometimes there are errors in the pattern draft itself, and sometimes I have no idea what happened.
In a dress like this, it's usually possible to trim away the excess from the hem, as long as the bust notch, the waist curve and the hip curve match up properly. If they don't, you'll have to recut the pattern piece. That's why it's such a good idea to check the pattern pieces before you start.
You should not stretch your dress pieces on a long seam like this to get them to match. Ever. Stretching either one will make your long seams ripply and, to be honest, look pretty ugly.
Once you have the pattern pieces lined up at the seams, place one pin at the under bust notch and one pin at the hemline. Find an approximate halfway point--move up from the skirt hem, keeping the two pattern piece seam lines lined up and lying smoothly--and place one pin there. This is the minimum number of pins for a long seam. I like to use two more--one at each halfway point between the middle and end pins.
Next, I line up the notches above the bust and pin. Since these two curves go in different directions for bust shaping, your seam line won't match up here and you may have to do a bit of stretching in this area--that's okay since the fabric is going to stretch over your bust there anyway.
It seems like it might save time to pin all the pieces together and then sit at the machine and sew. You can try this if you like, but I've always found that I get stabbed by the pins in the seams I'm not working on and everything kind of gets all tangled up. I prefer to pin one seam and then sew it.
Starting from the armhole, slowly sew to before the first notch. DO NOT STITCH OVER THE PIN!!! You can do some major damage to the knives of your serger, not to mention knocking out the timing or breaking a looper if you run pins through your machine. Remove the pin and continue stitching. You may have to stretch to get the fabric to lie smooth at these opposing curves. Make sure the edges of the fabric line up with one another--sew slowly and take your time. Once you've trimmed the seam allowance, you can't put it back, so make sure you only trim off what's allowed. Remove the pin at the lower bust notch.
Hold the fabric at the next pin in your left hand. Pull it toward you so that it is smooth but not taut. Use your right hand to line up the fabric edges and to guide the fabric through the machine. Do this in stages--at each pin, reposition your hands and use both of them to guide the fabric through the machine. DON'T STRETCH!
Repeat this with the remaining seams and start all the seams from the top of the garment. Directional sewing (sewing all seams going in the same direction) really does matter.
And after the seams are all sewn, don't forget to press.
Tuesday, May 3, 2011
Always Make (At Least One or Two) Test Buttonholes
Always make a test buttonhole before you start stitching on your project. Buttonholes are usually sewn last, so all your work can go right down the drain if you mess up the buttonholes. Take some of your leftover fabric scraps from when you cut out the pattern pieces and make yourself a test piece composed of the same elements as the shirt does where you're going to place the buttonholes. If there's a facing, there's probably a layer of fashion fabric, a layer of interfacing, and another layer of fashion fabric. If the front is self-faced, you likely have 2 or 3 layers of fashion fabric.
Whichever it is, make yourself a test scrap that's layered just like your project. You probably don't need more than 3 or 4 square inches...4 or 5 test buttonholes will probably be enough. Test for thread tension, test for size, test, test, test. When you're happy with the way they look, go ahead and sew your buttonholes on your project. Be careful. It's possible to rip out a poorly done buttonhole, but it isn't easy, nor is it fun.
After all the buttonholes on your project are sewn, then clip them. I use a seam ripper to cut a small slit it the middle of the button hole, and a sharp embroidery scissors to open it the rest of the way. Again, be careful. One, single clipped thread will probably make the whole buttonhole unravel. I hate when that happens.
Now, press your finger up against the newly clipped buttonhole. There's usually a couple of fabric fashion threads in there. Make sure they get snipped off. Sometimes these can get pulled when you put the buttons in the buttonholes and they can cause a flaw in the fabric of your otherwise perfect(!) project.
Since you've tested it, you know your button fits and you're all set.
Whichever it is, make yourself a test scrap that's layered just like your project. You probably don't need more than 3 or 4 square inches...4 or 5 test buttonholes will probably be enough. Test for thread tension, test for size, test, test, test. When you're happy with the way they look, go ahead and sew your buttonholes on your project. Be careful. It's possible to rip out a poorly done buttonhole, but it isn't easy, nor is it fun.
After all the buttonholes on your project are sewn, then clip them. I use a seam ripper to cut a small slit it the middle of the button hole, and a sharp embroidery scissors to open it the rest of the way. Again, be careful. One, single clipped thread will probably make the whole buttonhole unravel. I hate when that happens.
Now, press your finger up against the newly clipped buttonhole. There's usually a couple of fabric fashion threads in there. Make sure they get snipped off. Sometimes these can get pulled when you put the buttons in the buttonholes and they can cause a flaw in the fabric of your otherwise perfect(!) project.
Since you've tested it, you know your button fits and you're all set.
Buttons, Buttons, and More Buttons
I love buttons. Of all kinds. Metal, shell, wooden, horn. I tend to favor buttons made from natural materials, but I have some special synthetics that I love just as much. Every garment can benefit from the right buttons, though I'd still stick with the standard for men's button downs. Fabric.com has some gorgeous buttons and a nice selection. The one pictured here are made of shell with a laser cut design--they make this plain white shirt look downright classy and sophisticated.
If you like the Celtic style, there are plenty of options, too. These are a real favorite of mine, also available at Fabric.com. They are solid metal, rather than hollow, so they're not suitable for lightweight silks, but they're just fine for most fabrics. I put a set of these on a men's tropical wool vest.
Placement and size of buttons is important. Oversized buttons rarely look good on a button-down blouse--you're better off using 1/2" or 5/8" unless the shirt is specifically designed to accommodate something else. Buttons should be sewn at the center front mark on the pattern--resist the urge to move them in order to make a shirt fit more snugly, it'll only pull the shoulders in and make the shirt drape oddly.
Shirt buttons are not difficult to sew, though many people think so. With doubled thread, tie a knot in the end and take 5 stitches for buttons with one set of buttonholes or 4 stitches in each set of buttonholes for buttons with two sets. Some people advocate making a thread shank under the button, but I've never found this necessary for shirt buttons--coat, vest, skirt, or trouser buttons, though, that's a different story. You do have to sew them loosely or the fabric will get puckery and twisty and you put the buttons through the buttonholes. Some people sew over a toothpick or a straight pin; I like to use the shaft of a machine needle.
Shank buttons on a blouse or shirt follow the same rule: 5 stitches with doubled thread will hold the button secure.
Buttonholes are just as important as buttons, and a machine buttonholer is a must--unless you love hand embroidery and want to learn how to make hand-sewn buttonholes. They are beautiful when executed perfectly and can make your garment look very, very high-end, but done poorly, you might as well do them in bright red acrylic yarn and scream, "Look! I made it myself! Badly!" Expect to practice a lot first.
Machine buttonholes, on the other hand, are usually a breeze--unless you have a sewing machine famous for doing lousy buttonholes. Most machines make acceptable buttonholes, though, and chances are good that yours is one of them. Tension can be tricky with machine buttonholes, though. Remember that you want the buttonhole to look its best on the right side, so sometimes it's prudent to tighten the bobbin tension just enough so that the needle thread is pulled to the underside just a little.
If you like the Celtic style, there are plenty of options, too. These are a real favorite of mine, also available at Fabric.com. They are solid metal, rather than hollow, so they're not suitable for lightweight silks, but they're just fine for most fabrics. I put a set of these on a men's tropical wool vest.
Placement and size of buttons is important. Oversized buttons rarely look good on a button-down blouse--you're better off using 1/2" or 5/8" unless the shirt is specifically designed to accommodate something else. Buttons should be sewn at the center front mark on the pattern--resist the urge to move them in order to make a shirt fit more snugly, it'll only pull the shoulders in and make the shirt drape oddly.
Shirt buttons are not difficult to sew, though many people think so. With doubled thread, tie a knot in the end and take 5 stitches for buttons with one set of buttonholes or 4 stitches in each set of buttonholes for buttons with two sets. Some people advocate making a thread shank under the button, but I've never found this necessary for shirt buttons--coat, vest, skirt, or trouser buttons, though, that's a different story. You do have to sew them loosely or the fabric will get puckery and twisty and you put the buttons through the buttonholes. Some people sew over a toothpick or a straight pin; I like to use the shaft of a machine needle.
Shank buttons on a blouse or shirt follow the same rule: 5 stitches with doubled thread will hold the button secure.
Buttonholes are just as important as buttons, and a machine buttonholer is a must--unless you love hand embroidery and want to learn how to make hand-sewn buttonholes. They are beautiful when executed perfectly and can make your garment look very, very high-end, but done poorly, you might as well do them in bright red acrylic yarn and scream, "Look! I made it myself! Badly!" Expect to practice a lot first.
Machine buttonholes, on the other hand, are usually a breeze--unless you have a sewing machine famous for doing lousy buttonholes. Most machines make acceptable buttonholes, though, and chances are good that yours is one of them. Tension can be tricky with machine buttonholes, though. Remember that you want the buttonhole to look its best on the right side, so sometimes it's prudent to tighten the bobbin tension just enough so that the needle thread is pulled to the underside just a little.
Labels:
buttonholes,
buttons,
Fabric.com,
notions,
technique,
tip
Subscribe to:
Posts (Atom)