Hmmm. I can't really make a joke to save my life, can I?
Here's the newest project: A pair of board shorts for Youngest Son. Because we really want to be ready for summer swimming as soon as the water warms up.
The pattern is Kwik Sew 3430...one of the older ones that were still printed on heavy paper. I'm hoping I can use the pattern this year and next year yet, because after that I'll have to find a men's pattern for him. Boy's patterns are so much easier to find than men's that I'm not looking forward to the treasure hunt.
Anyway, these are made from microfiber purchased from fabricfairy.com. I only ordered 1/2 yard each of the print and the navy, not realizing how loooooong board shorts are. So those navy design details at the hems of each leg? Yeah, that's the extra length I needed for the pattern pieces. If I'd checked the pattern envelope for yardage needed, I would've known. I'm going to try not to make that mistake again.
In any event, these went together pretty nicely with no problems. Though I used 1 inch elastic for the waist instead of 2 pieces of 3/8 inch like the instructions call for. You can't really see the front tabs where the lacing goes through because of the crazy print fabric, but they're there.
I think when I make these again, I'll sew 1 inch hems. I think it would look better with deeper hems, but that's really the only thing I'd do differently. We'll have to see how they work in the water before I can make a final judgement, though.
Showing posts with label Kwik Sew. Show all posts
Friday, May 23, 2014
Sunday, November 24, 2013
Sewing Fly Front Pants -- Love 'Em or Hate 'Em?
I realized that, over my many years of sewing, I haven't made very many fly front pants. I don't think it's because I hate them, though. I hadn't given them enough consideration to feel one way or another about them.
For boys' pants, I've used Kwik Sew 3399 to make a pair of trousers for my oldest son. And I used Burda 9860 right around the same time, about 2006. Sadly, the pictures of these are lost, but the links go to the reviews I wrote for them on PatternReview.com. The Kwik Sew instructions were excellent and I recall referring back to them when I made the Burda pants. Logical, since Burdas are famous for their rather, um, sparse, instructions. And it was good that I had those Kwik Sew instructions. Because without them, I probably ouldn't have realized that the Burda pattern had mysteriously omitted the pattern piece for the zipper shield.
I pulled out that Kwik Sew pattern again, and reread the instructions for
installing the fly zipper. They were just as easy as I remembered them
to be. I didn't have any trouble installing it, and these were my very
first ones. Many people have applauded Kwik Sew's instructions, and I
think the reputation is well-deserved.
I've only sewn one pair of Men's fly front pants. It was a Vogue pattern and I truly did hate that pattern. All the lines seemed to be off somehow, and nothing about it looked right. It was years ago and so I doubt that pattern is in print anymore. And I don't remember it's number, anyway. But absolutely nothing about the fly front sticks in my mind, so I'm going to assume that there was at least nothing wrong with it.
Women's fly fronts, now that's a little bit of a different story. My first women's fly front pants were made from a now out-of-print Kwik Sew pattern way back in 2006. The pictures of these were also lost but you can read the review of the pattern on PatternReview.com if you're interested.
More recently, I just made Jalie 2908 Stretch Jeans for the Mini Wardrobe contest on Pattern Review. Jalie's fly front instructions are a little different from Kwik Sew's. I remember while I was making them that the instructions seemed ever-so-slightly more complicated, but I found that I really liked the technique. And the fly didn't stand open when I sat down, which I really liked. To me, it had just one flaw: the zipper teeth seemed to be positioned way closer to center front than in RTW. So there's not much more than a quarter inch of fabric covering the teeth, and I didn't like that. This may not be the pattern. As I said, I haven't done that many fly fronts, so it might be operator error. But I like the way RTW conceals the zipper way underneath the outside fly cover. I resolved to figure out how to do that. I figured it couldn't possibly be that hard.
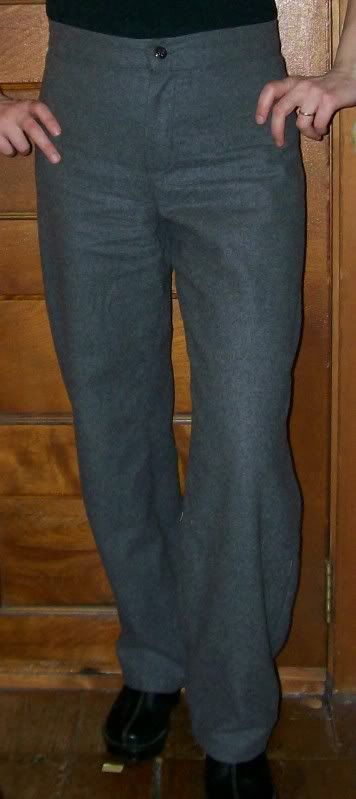
Fast forward a couple of weeks. This morning it was 12F degrees in our little corner of the world. Brrrrr. I decided it was a good day to pull out my wool melton trousers.
It wasn't until I had been wearing them half the day that I realized it had just what I was looking for in a fly front. I was astonished. Going back to read the original review, I saw that apparently I wasn't impressed with the instructions for the fly front, but I gotta tell ya, I am definitely impressed with the results. The pattern is New Look 6709, and yes, I'm sorry, it is yet another OOP. I've been buying patterns for a looooong time. And I think I've only thrown, given, or sold away less than a dozen in all those years.
So now that I've spent some time considering the issue, do I hate 'em or love 'em? Hmmmm. I think I like them enough to really work out a technique that works for me. And then I suspect I'm going to love 'em. Because I still wear jeans most days of the week and finding my size has been getting harder lately. Making my own will solve that problem and give me the satisfaction of making even more of my clothes than I already do.
So what about you? Fly front pants. Do you love 'em or hate 'em, even if you don't make 'em?
![]() |
| Burda 9860 |
![]() |
| Kwik Sew 3399 |
I've only sewn one pair of Men's fly front pants. It was a Vogue pattern and I truly did hate that pattern. All the lines seemed to be off somehow, and nothing about it looked right. It was years ago and so I doubt that pattern is in print anymore. And I don't remember it's number, anyway. But absolutely nothing about the fly front sticks in my mind, so I'm going to assume that there was at least nothing wrong with it.
Women's fly fronts, now that's a little bit of a different story. My first women's fly front pants were made from a now out-of-print Kwik Sew pattern way back in 2006. The pictures of these were also lost but you can read the review of the pattern on PatternReview.com if you're interested.
More recently, I just made Jalie 2908 Stretch Jeans for the Mini Wardrobe contest on Pattern Review. Jalie's fly front instructions are a little different from Kwik Sew's. I remember while I was making them that the instructions seemed ever-so-slightly more complicated, but I found that I really liked the technique. And the fly didn't stand open when I sat down, which I really liked. To me, it had just one flaw: the zipper teeth seemed to be positioned way closer to center front than in RTW. So there's not much more than a quarter inch of fabric covering the teeth, and I didn't like that. This may not be the pattern. As I said, I haven't done that many fly fronts, so it might be operator error. But I like the way RTW conceals the zipper way underneath the outside fly cover. I resolved to figure out how to do that. I figured it couldn't possibly be that hard.
Fast forward a couple of weeks. This morning it was 12F degrees in our little corner of the world. Brrrrr. I decided it was a good day to pull out my wool melton trousers.
It wasn't until I had been wearing them half the day that I realized it had just what I was looking for in a fly front. I was astonished. Going back to read the original review, I saw that apparently I wasn't impressed with the instructions for the fly front, but I gotta tell ya, I am definitely impressed with the results. The pattern is New Look 6709, and yes, I'm sorry, it is yet another OOP. I've been buying patterns for a looooong time. And I think I've only thrown, given, or sold away less than a dozen in all those years.
So now that I've spent some time considering the issue, do I hate 'em or love 'em? Hmmmm. I think I like them enough to really work out a technique that works for me. And then I suspect I'm going to love 'em. Because I still wear jeans most days of the week and finding my size has been getting harder lately. Making my own will solve that problem and give me the satisfaction of making even more of my clothes than I already do.
So what about you? Fly front pants. Do you love 'em or hate 'em, even if you don't make 'em?
Wednesday, October 2, 2013
Mini Wardrobe -- Finished Contest Entry Safari Style
So here it is: My finished contest entry. Safari style extravaganza! If you're a PatternReview.com member, you can vote for your favorite mini wardrobe. Check out all the entries. So many people have done such a fantastic job. It was a real pleasure to chat with them on the message board for the whole trip.
The tank top is a modified Kwik Sew 2517. It would have to be -- that pattern is actually a dress. I've made this tank top lots of times and I really love it. For this one, I used the original armhole curve, but I've also modified the pattern to make a racerback tank top as well.
The pants are Jalie 2908 stretch jeans. For these, I added expanding cargo pockets to the back and thighs and narrowed the pants legs so they'll fit smoothly into my boots. I love these pants. I wore them all day yesterday and they are oh-so-comfy.
The button down shirt is Jalie 2322 done in a stretch linen. Also a comfortable fabric. I wish I'd bought more than just enough for one shirt.
And the vest is Butterick 5616 made in the same stretch sateen as the pants. With extra pockets.
I am really loving all of these outfits. Different shoes give a whole different look to them, too.
The tank top is a modified Kwik Sew 2517. It would have to be -- that pattern is actually a dress. I've made this tank top lots of times and I really love it. For this one, I used the original armhole curve, but I've also modified the pattern to make a racerback tank top as well.
The pants are Jalie 2908 stretch jeans. For these, I added expanding cargo pockets to the back and thighs and narrowed the pants legs so they'll fit smoothly into my boots. I love these pants. I wore them all day yesterday and they are oh-so-comfy.
The button down shirt is Jalie 2322 done in a stretch linen. Also a comfortable fabric. I wish I'd bought more than just enough for one shirt.
And the vest is Butterick 5616 made in the same stretch sateen as the pants. With extra pockets.
I am really loving all of these outfits. Different shoes give a whole different look to them, too.
Saturday, June 15, 2013
Back in the Sewing (and Blogging) Saddle At Last
It's been a busy few months, but I'm finally getting some sewing done. Last night I finished the shirt for my oldest son that's been hanging on my dress form waiting for buttonholes and buttons for about three months now. I double stitched the mock flat-felled armhole seams, partly because in my first pass I didn't catch the folded over seam allowances in some spots and partly because I wanted it to look a little different from the other two I made in this fabric. This was the last of this nice yarn-dyed stretch shirting that made such beautiful dress shirts. Ah, shucks, I'll have to do some more fabric shopping...
I also made a whole series of pants and tees for Youngest Son. They're not very exciting, but sometimes practical sewing takes precedence over the fanciful stuff. Youngest Son likes the cargo pockets on these, and always tells me to be sure to put them on. I've got OOP Jalie 2107 -- Men and Boys Pants pattern. I think I'm going to use that one for his next pair of pants.
Youngest Son's shirt series used up of alot of my knits in earth tones -- I'm going to have to do some more searching and buying in that department, too. I've been making raglan tees for him, but this year I decided to trace out the regular tee from Kwik Sew's Sewing for Children book. I sized down to get rid of the enormous '80's ease and lengthened for the proper fit. They turned out very nice, though I see that, after a few washings, I'll need to reduce the length of the neckline ribbing. I hate it when it bunches up at the inside edge of the curve. It's truly amazing how shortening the ribbing by just 1/4 inch can make the neckline look so much better.
That's for the boys. I've done some sewing for Daughter, too. But I'll get to that next time.
I also made a whole series of pants and tees for Youngest Son. They're not very exciting, but sometimes practical sewing takes precedence over the fanciful stuff. Youngest Son likes the cargo pockets on these, and always tells me to be sure to put them on. I've got OOP Jalie 2107 -- Men and Boys Pants pattern. I think I'm going to use that one for his next pair of pants.
Youngest Son's shirt series used up of alot of my knits in earth tones -- I'm going to have to do some more searching and buying in that department, too. I've been making raglan tees for him, but this year I decided to trace out the regular tee from Kwik Sew's Sewing for Children book. I sized down to get rid of the enormous '80's ease and lengthened for the proper fit. They turned out very nice, though I see that, after a few washings, I'll need to reduce the length of the neckline ribbing. I hate it when it bunches up at the inside edge of the curve. It's truly amazing how shortening the ribbing by just 1/4 inch can make the neckline look so much better.
That's for the boys. I've done some sewing for Daughter, too. But I'll get to that next time.
Monday, February 4, 2013
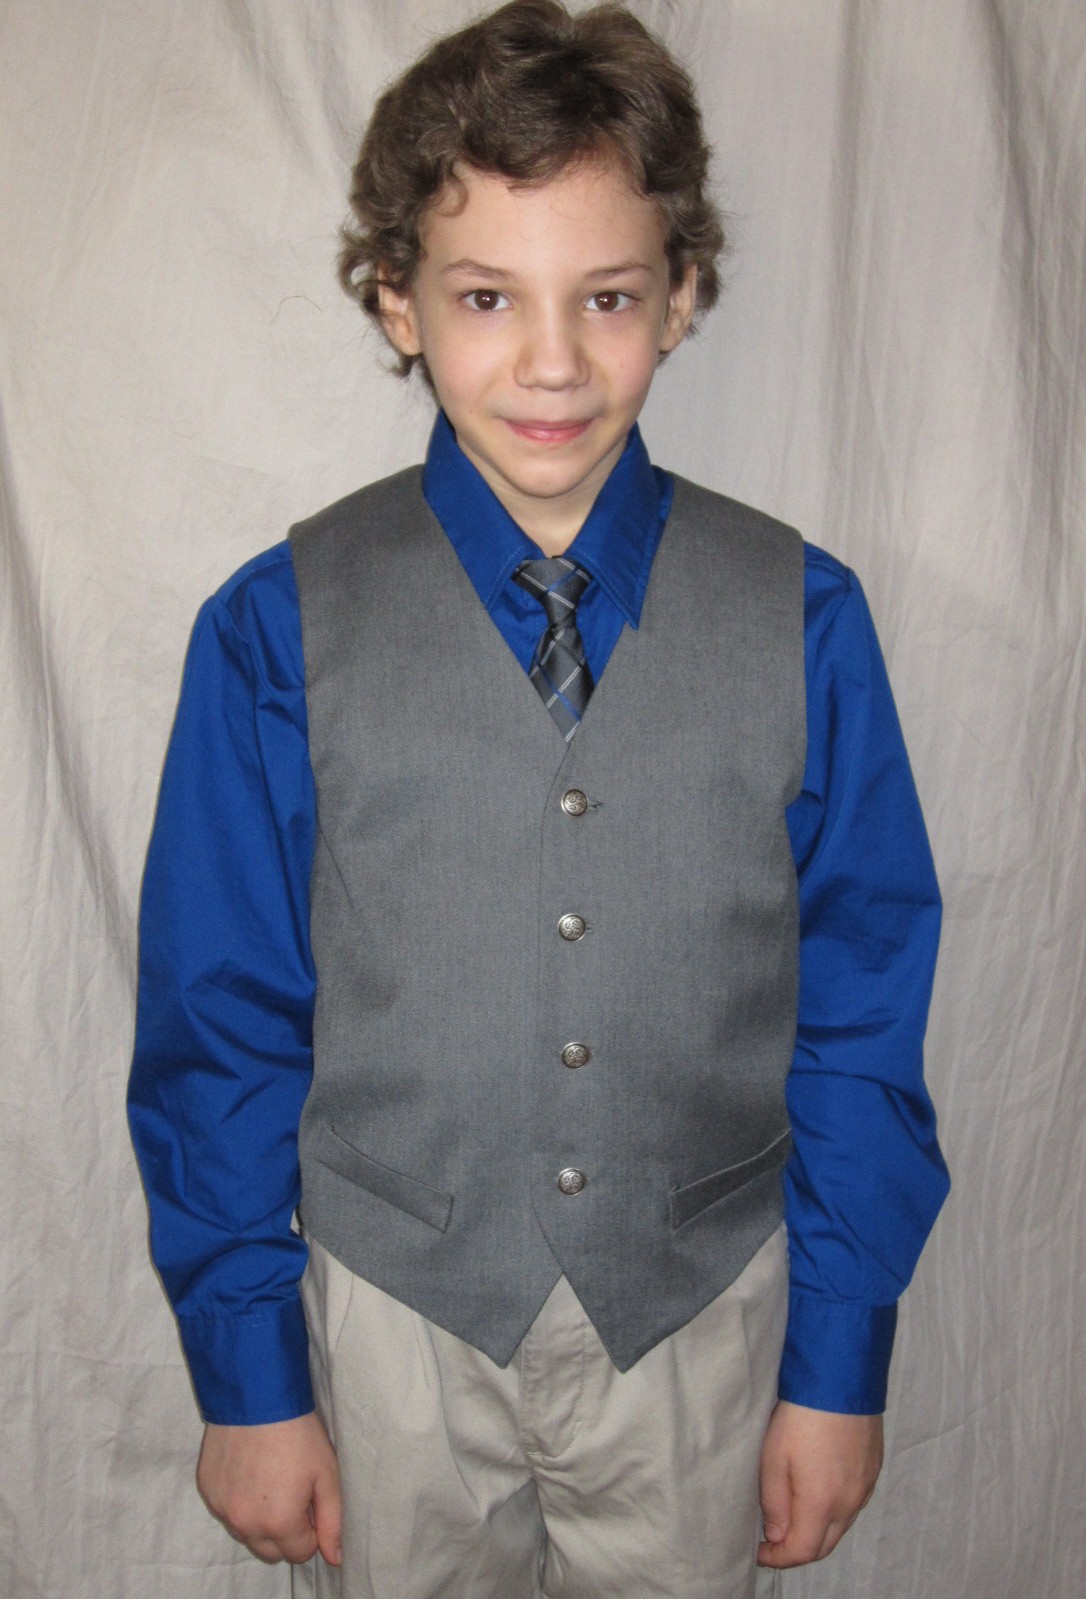
Kwik Sew 3399 -- Boys' Vest
I finished this one right around the first week of January, but I was so caught up in my contest entries for the One Pattern Many Looks Contest that I hadn't gotten around to taking a picture until now.
It's so hard to sew fun things for boys. Oh, yes. Another shirt. *sigh* Oh, look. Another pair of pants. *sigh* I've been searching for cool things that I can make for my guys, and the finding has been pretty darn slow. But I am making progress, so hopefully you'll be seeing more guy stuff this year than I've been able to make in the past.
Here's the pattern envelope. I bought this one many years ago to make trousers for my older boys when they were little, but this is the first time I've made the vest pattern. This means that it's printed on the older, heavy white paper that I hear Kwik Sew isn't using anymore.
I traced out the medium, and I was surprised to find separate pattern pieces for the lining and facings. Actually, this vest has a pretty cool back neckline facing, which makes it pretty fancy looking on the inside. It doesn't have real pockets, though, just the usual decorative pieces that look like they might be hiding a welt pocket but aren't.
The shell is a wool twill suiting, fairly lightweight. The lining is a blue and black geometric jacquard of uncertain fiber content. It's actually of a heavier weight than the wool, so it gives the vest some body that it wouldn't otherwise have. The buttons are a solid metal that I got from an ebay seller from Quebec.
The first version I made was pretty cute, but Youngest Son has the family long torso. Which means the vest was too short. After much consultation with his older brothers, we determined that his vest really needed to be about two inches longer.
I added two inches to the body of the vest and came up with version two. With the addition of the extra two inches, I needed to add another button to the front closure. Somehow three just didn't look right, I think it violated the phi ratio or something. But those were the only changes I made; shell fabric, lining fabric, and buttons were all the same as version one.
This was met with approval by all three brothers, and that is how the vest was won.
Okay, that pun was totally cringe-worthy. I apologize to everyone.
Now all he needs is a pair of gray trousers to go with the vest. I still have lots of the gray wool and it is definitely soft enough to wear right against your skin, so I think I'll be adding the trousers from this pattern to my upcoming projects list.
It's so hard to sew fun things for boys. Oh, yes. Another shirt. *sigh* Oh, look. Another pair of pants. *sigh* I've been searching for cool things that I can make for my guys, and the finding has been pretty darn slow. But I am making progress, so hopefully you'll be seeing more guy stuff this year than I've been able to make in the past.
Here's the pattern envelope. I bought this one many years ago to make trousers for my older boys when they were little, but this is the first time I've made the vest pattern. This means that it's printed on the older, heavy white paper that I hear Kwik Sew isn't using anymore.
I traced out the medium, and I was surprised to find separate pattern pieces for the lining and facings. Actually, this vest has a pretty cool back neckline facing, which makes it pretty fancy looking on the inside. It doesn't have real pockets, though, just the usual decorative pieces that look like they might be hiding a welt pocket but aren't.
The shell is a wool twill suiting, fairly lightweight. The lining is a blue and black geometric jacquard of uncertain fiber content. It's actually of a heavier weight than the wool, so it gives the vest some body that it wouldn't otherwise have. The buttons are a solid metal that I got from an ebay seller from Quebec.
The first version I made was pretty cute, but Youngest Son has the family long torso. Which means the vest was too short. After much consultation with his older brothers, we determined that his vest really needed to be about two inches longer.
I added two inches to the body of the vest and came up with version two. With the addition of the extra two inches, I needed to add another button to the front closure. Somehow three just didn't look right, I think it violated the phi ratio or something. But those were the only changes I made; shell fabric, lining fabric, and buttons were all the same as version one.
This was met with approval by all three brothers, and that is how the vest was won.
Okay, that pun was totally cringe-worthy. I apologize to everyone.
Now all he needs is a pair of gray trousers to go with the vest. I still have lots of the gray wool and it is definitely soft enough to wear right against your skin, so I think I'll be adding the trousers from this pattern to my upcoming projects list.
Thursday, January 3, 2013
It's a Brand New Year--Boy's Wool Vest
I feel like I slept through the end of 2012. I hope I was just resting up and preparing for an exciting 2013.
I always find that Christmas and New Year's disrupts my schedule so much that it takes me a couple of weeks to settle down and re-establish my routine. I don't know how much sewing I'll manage, but I have every intention of sticking to my hour a day.
The first project of 2013 is this wool suiting vest for Youngest Son. I had meant it to be the last one of 2012, but it didn't work out that way. I made one, but Youngest Son apparently possesses the dreaded long torso that plagues the rest of us -- it was too short by about 2 inches.
The pattern is Kwik Sew 3399. I've used this pattern for the trousers already, way back when either Jordan or Josh was young enough to fit in it. That would have been quite a while ago and I remember absolutely nothing about it -- other than that it happened, of course.
So, I've added 2 inches to the pattern length and recut all the pieces. This is a nice, sharp vest pattern--looks good on both the inside and the out. All the interfacings have been fused and much of the sewing has been done. I really just need a couple of hours and it'll be done -- including the buttonholes. If I don't get to it today, I'm confident I'll get it finished tomorrow.
I always find that Christmas and New Year's disrupts my schedule so much that it takes me a couple of weeks to settle down and re-establish my routine. I don't know how much sewing I'll manage, but I have every intention of sticking to my hour a day.
The first project of 2013 is this wool suiting vest for Youngest Son. I had meant it to be the last one of 2012, but it didn't work out that way. I made one, but Youngest Son apparently possesses the dreaded long torso that plagues the rest of us -- it was too short by about 2 inches.
The pattern is Kwik Sew 3399. I've used this pattern for the trousers already, way back when either Jordan or Josh was young enough to fit in it. That would have been quite a while ago and I remember absolutely nothing about it -- other than that it happened, of course.
So, I've added 2 inches to the pattern length and recut all the pieces. This is a nice, sharp vest pattern--looks good on both the inside and the out. All the interfacings have been fused and much of the sewing has been done. I really just need a couple of hours and it'll be done -- including the buttonholes. If I don't get to it today, I'm confident I'll get it finished tomorrow.
Friday, October 21, 2011
The Girls' Cape -- Finished!
Yay! I finished the Girls' Cape on Wednesday afternoon.
I used the hood and neckline from Kwik Sew's Sewing for Children book, but the body of the cloak I drafted using measurements. I've included a photo tutorial on How to Draft a Girl's Cape using a hood and a neckline from another pattern.
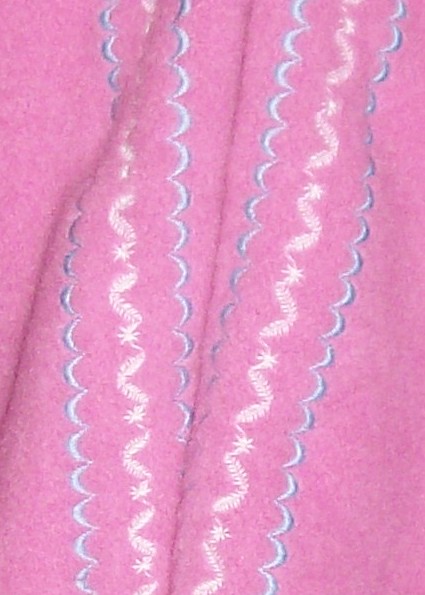
I tested the fit first by making a trial run/possible wearable muslin/possible cape lining out of some pretty pink fleece with embroidered and sequined butterflies that I picked up at JoAnn's a couple of years ago. The fabric has a dark stripe running down the middle from being folded and stored for so long that I didn't notice (naturally!) until I had the thing all assembled. I'm really hoping it will wash out. If not, well, it makes a cute (and warm!) lining.
There weren't really any fit issues. The neckline was a little larger than I intended, but not a deal breaker, and the length was good. That little bit extra makes a garment with some growing room that a girl can wear for a long time (that's what I'm telling myself, anyway). Besides, a cape is one of those things where you have a fair amount of forgiveness for small errors. I kind of wish I'd used a larger hood, though.
I washed and dried the melton a couple of weeks ago in preparation for this project to get all that pesky shrinking out of the way. I am expecting to launder this by machine washing on the hand wash setting and hanging to dry. I take care of all my family's wool garments that way and I haven't had a problem yet (hear that sound? It's me knocking on wood).
I didn't want to make this with just boring plain pink wool on the outside -- I was hoping for something both practical and pretty. The edges of this cape measure nearly 17 feet altogether and the hem is very curved -- it's basically a big circle with a hood in the middle. I wanted a wide decorative edge and realized that a wide ribbon would not be stitched gracefully to a hem like that, so I broke out my handy, dandy Kenmore 19233. It took some time to find a combination of stitches (this is the first time I'm seriously wishing I had an embroidery machine) that I thought looked nice. I stitched that combination all around the edges after assembling the wool shell but before hemming/attaching the lining.
It took three passes with the machine to create the motif. And it took me 2 1/2 hours to stitch that 50 foot length. Thankfully, my machine was very cooperative (it only needed one cool-down period and the thread only broke once...we won't mention all the times I ran out of bobbin thread, though), and it gave me a use for all that cotton thread I bought way back when I was an all-cotton purist. Of course, cotton thread and children's clothes is actually not a good combination for construction seams. But I digress.
I'm really pleased with the way the embroidery turned out as well. I never thought I'd be able to get the machine to stitch the pattern evenly over those heavy neckline and shoulder seams. I pressed the seams open and steamed them as flat as I could. Then I had to stitch very slowly over them and keep the fabric very taut by holding on to it tightly in front and in back of the needle so that the fabric would still feed evenly. Way to go, Kenmore! This machine is great!
I used this very pretty two piece clasp for fastening the cape at the neck, edge-to-edge. Sorry the color is messed up -- I really need a new camera).
I attached the fleece lining to the wool shell at just the front and hood edges. I hemmed the bottom edges separately and left them free of each other. The fleece is done with a plain hem and the melton is stitched with a blind hem just using a long and wide zigzag.
All in all, this turned out to be an extraordinary finished project and I am really happy with it. As you can see, I'm not the only one :)
I used the hood and neckline from Kwik Sew's Sewing for Children book, but the body of the cloak I drafted using measurements. I've included a photo tutorial on How to Draft a Girl's Cape using a hood and a neckline from another pattern.
I tested the fit first by making a trial run/possible wearable muslin/possible cape lining out of some pretty pink fleece with embroidered and sequined butterflies that I picked up at JoAnn's a couple of years ago. The fabric has a dark stripe running down the middle from being folded and stored for so long that I didn't notice (naturally!) until I had the thing all assembled. I'm really hoping it will wash out. If not, well, it makes a cute (and warm!) lining.
There weren't really any fit issues. The neckline was a little larger than I intended, but not a deal breaker, and the length was good. That little bit extra makes a garment with some growing room that a girl can wear for a long time (that's what I'm telling myself, anyway). Besides, a cape is one of those things where you have a fair amount of forgiveness for small errors. I kind of wish I'd used a larger hood, though.
I washed and dried the melton a couple of weeks ago in preparation for this project to get all that pesky shrinking out of the way. I am expecting to launder this by machine washing on the hand wash setting and hanging to dry. I take care of all my family's wool garments that way and I haven't had a problem yet (hear that sound? It's me knocking on wood).
I didn't want to make this with just boring plain pink wool on the outside -- I was hoping for something both practical and pretty. The edges of this cape measure nearly 17 feet altogether and the hem is very curved -- it's basically a big circle with a hood in the middle. I wanted a wide decorative edge and realized that a wide ribbon would not be stitched gracefully to a hem like that, so I broke out my handy, dandy Kenmore 19233. It took some time to find a combination of stitches (this is the first time I'm seriously wishing I had an embroidery machine) that I thought looked nice. I stitched that combination all around the edges after assembling the wool shell but before hemming/attaching the lining.
It took three passes with the machine to create the motif. And it took me 2 1/2 hours to stitch that 50 foot length. Thankfully, my machine was very cooperative (it only needed one cool-down period and the thread only broke once...we won't mention all the times I ran out of bobbin thread, though), and it gave me a use for all that cotton thread I bought way back when I was an all-cotton purist. Of course, cotton thread and children's clothes is actually not a good combination for construction seams. But I digress.
I'm really pleased with the way the embroidery turned out as well. I never thought I'd be able to get the machine to stitch the pattern evenly over those heavy neckline and shoulder seams. I pressed the seams open and steamed them as flat as I could. Then I had to stitch very slowly over them and keep the fabric very taut by holding on to it tightly in front and in back of the needle so that the fabric would still feed evenly. Way to go, Kenmore! This machine is great!
I used this very pretty two piece clasp for fastening the cape at the neck, edge-to-edge. Sorry the color is messed up -- I really need a new camera).
I attached the fleece lining to the wool shell at just the front and hood edges. I hemmed the bottom edges separately and left them free of each other. The fleece is done with a plain hem and the melton is stitched with a blind hem just using a long and wide zigzag.
All in all, this turned out to be an extraordinary finished project and I am really happy with it. As you can see, I'm not the only one :)
| Let the wind blow!! I'll be warm and dry! |
Thursday, October 20, 2011
Making a Girls' Cape
I called this a cloak at first, but I think it's probably more accurate to call it a cape, since I decided to make it a bit shorter than full length to cut down on tripping incidents. I used a few basic pattern pieces and some simple geometry to make a pattern. I could, of course, buy a pattern, but this way is more fun :-)
You'll need a hood pattern (and it's accompanying neckline) for this to work -- I used the hood pattern from Kwik Sew's Sewing for Children book and the neckline from their hooded jacket pattern. It is intended for knits, but since this is a loose fitting design, I estimated what I thought would be a good fit and ended up using their smallest size.
If you do alot of sewing for kids, I cannot recommend this book enough. It has all the master patterns you could ever need for all the basics for kids and includes instructions on how to alter those patterns for different options. It's true that the styles are dated, but I believe this is a must-have for kids' sewing.
Okay, back to the instructions.
First I determined the length of the cape by measuring from the neckline to the wrist with the arm extended to the side. This measurement was 17 inches.
Then:
1. I traced the neckline for the front on one corner of my tracing paper. The black line is the original, the red line is the neckline after alterations.
If you're using the Kwik Sew hood:
The seam allowances on this pattern are 1/4" -- a little too small for outerwear fabrics. I added another 1/4" so I have a 1/2" seam allowance. Since the neckline is intended to be cut on a fold, I also made sure I traced far enough from the edge (1 inch) to allow for the hems at center front. I also added 1/4" to the shoulder seam allowance.
If you're using another pattern:
You'll have to check the seam allowances. If they're the regular 5/8" you'll be fine -- you don't need to add anything to the seam allowances. Otherwise, you might have to tweak things around a bit. Also, if your center front is on a fold, you'll still have to add that extra 1 inch.
2. I measured 19 inches (17" for length, 1/2" X 2 for seam allowances, 1" for hem) from the neckline at center front to the hem.
3. I measured the same 19 inch measure from the neckline at the shoulder seam to the hem, at a right angle to the first edge. I used the edge of my clear ruler to draw a clean, straight line.
Here's the geometry part:
Extend the side seam line and the center front line toward the upper right corner and mark the point where they cross. Draw several guidelines radiating out from that point. This will help make the curved hem even all the way around.
4. I measured 19 inches all along the arc of the neckline to the hem and connected all the markings. Note that I measured 19 inches from the neckline arc, not 19 inches from the point at which all the black guidelines converge at the upper right corner.
I smoothed out the lines using a dressmakers' ruler.
5. I repeated steps 1-4 for the back leaving out the extra 1 inch at center back, since this will get cut on a fold. Mark your pattern clearly so that you remember that.
Now I have my pattern pieces for the hood, the front, and the back.
You'll need a hood pattern (and it's accompanying neckline) for this to work -- I used the hood pattern from Kwik Sew's Sewing for Children book and the neckline from their hooded jacket pattern. It is intended for knits, but since this is a loose fitting design, I estimated what I thought would be a good fit and ended up using their smallest size.
If you do alot of sewing for kids, I cannot recommend this book enough. It has all the master patterns you could ever need for all the basics for kids and includes instructions on how to alter those patterns for different options. It's true that the styles are dated, but I believe this is a must-have for kids' sewing.
Okay, back to the instructions.
First I determined the length of the cape by measuring from the neckline to the wrist with the arm extended to the side. This measurement was 17 inches.
Then:
![]() |
| This is just a representation. It is NOT Kwik Sew's neckline draft |
If you're using the Kwik Sew hood:
The seam allowances on this pattern are 1/4" -- a little too small for outerwear fabrics. I added another 1/4" so I have a 1/2" seam allowance. Since the neckline is intended to be cut on a fold, I also made sure I traced far enough from the edge (1 inch) to allow for the hems at center front. I also added 1/4" to the shoulder seam allowance.
If you're using another pattern:
You'll have to check the seam allowances. If they're the regular 5/8" you'll be fine -- you don't need to add anything to the seam allowances. Otherwise, you might have to tweak things around a bit. Also, if your center front is on a fold, you'll still have to add that extra 1 inch.
2. I measured 19 inches (17" for length, 1/2" X 2 for seam allowances, 1" for hem) from the neckline at center front to the hem.
3. I measured the same 19 inch measure from the neckline at the shoulder seam to the hem, at a right angle to the first edge. I used the edge of my clear ruler to draw a clean, straight line.
Here's the geometry part:
Extend the side seam line and the center front line toward the upper right corner and mark the point where they cross. Draw several guidelines radiating out from that point. This will help make the curved hem even all the way around.
4. I measured 19 inches all along the arc of the neckline to the hem and connected all the markings. Note that I measured 19 inches from the neckline arc, not 19 inches from the point at which all the black guidelines converge at the upper right corner.
I smoothed out the lines using a dressmakers' ruler.
5. I repeated steps 1-4 for the back leaving out the extra 1 inch at center back, since this will get cut on a fold. Mark your pattern clearly so that you remember that.
Now I have my pattern pieces for the hood, the front, and the back.
When cutting out your fabric, be sure to cut two fronts, two hood pieces, and one back on the fold. Clip the neckline at center back to mark where your hood seam should match up.
The sewing part is pretty easy.
1. Sew the hood seam.
2. Sew the shoulder seams.
3. Sew the hood to the neckline, matching up the front edges and the center back notch.
4. Hem the whole thing in one long hem for an unlined cape
or
Make two capes, sew the front and hood edges right sides together using a 1 inch seam allowance and hem the bottom edges of both for a lined and/or reversible cape.
All done!
Monday, August 29, 2011
Sewing For Kids -- Tshirts Assembly Line Style
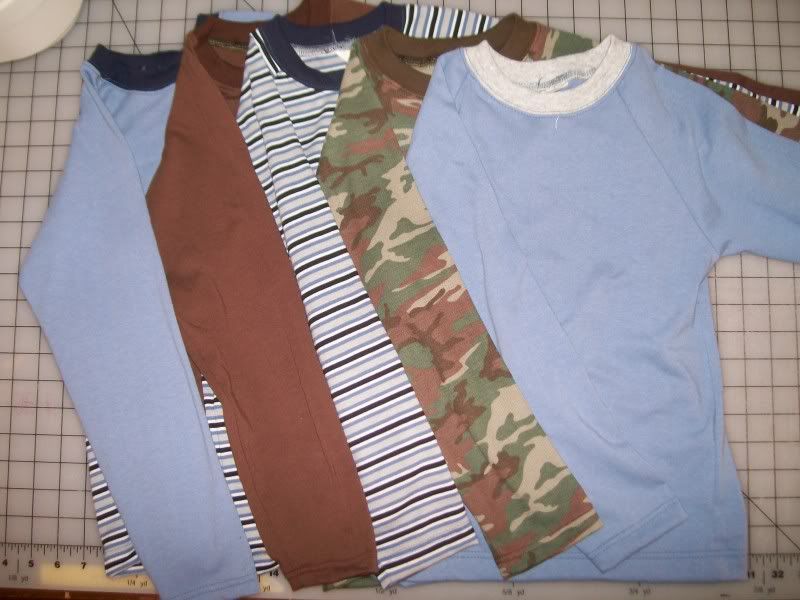
Five Kwik Sew 2894 long sleeved tees for my youngest son. The striped fabric came from Fabric.com a couple of years ago--I've been making shirts for my son with the many yards I bought. This is finally the last of it. A good thing, since I think he's rather tired of blue striped shirts. The slate blue jersey I bought from eBay about 5 years ago--it was my first purchase of a bolt of fabric. I never realized just how many garments you can make with ten yards of fabric. The brown and the camo also came from Fabric.com--the organic jerseys make nice tees for adults, too.
Anyway, they're all finished, hemmed and ready to wear. I like these raglan tees and I've been using this pattern for quite some time. What I like most is that they are, except for the hems, completely serged. And if you put cuffs on the sleeves, only the bottom needs to be hemmed.
Now, though, I'm finally ready to get to work on that Fringe Festival Top.
Anyway, they're all finished, hemmed and ready to wear. I like these raglan tees and I've been using this pattern for quite some time. What I like most is that they are, except for the hems, completely serged. And if you put cuffs on the sleeves, only the bottom needs to be hemmed.
Now, though, I'm finally ready to get to work on that Fringe Festival Top.
Labels:
boys,
cotton,
Fabric.com,
jersey,
knits,
Kwik Sew,
project,
SewingForKids,
shirt
Saturday, August 27, 2011
Practical Sewing and Hurricane Delay
I had planned to make the Fringe Festival top this past weekend, but practical sewing got in my way. It seems that Mother Nature decided to give us a cooler late summer this year, so I started making fall clothes for the kids. Instead of cutting out my own top, I ended up spending my sewing time cutting out some long sleeve tees for my youngest son.
I use Kwik Sew 2894 to make kids' raglan tees. I've been using this pattern for quite some time and I'm always pleased with the results. The only thing that I have to change is that I always, no matter the size, shorten the pattern piece for the neckline ribbing. Usually it's just 1/4 inch or so (for a full 1/2 inch shorter neckline binding), but sometimes it's a hair more. I found that this makes the neckline binding lay flat against the neck and is much less likely to stretch out with time.
Assembly line style, I cut out one of brown organic jersey, one of slate blue jersey, one of slate blue and navy striped jersey, one that I color blocked using the two blues, and one of green and brown camouflage in thermal knit. I have lots of different ribbing in my stash, so it's usually just a matter of picking the one that's the closest color match or using a contrast color for a "ringer tee".
When it came time for sewing, I sewed the camo and the brown first and then changed serger thread for the three blue ones. Four shirts with only a single thread change. I love efficiency.
But wait! That's only four. What happened to the fifth one?
Naturally, I discovered (after putting all the fabric and pattern pieces away, of course) that for the blue jersey I cut out two shirt fronts instead of a front and a back--it couldn't be two backs, couldn't it? Where I could just recut the neckline? Noooo. It had to be two fronts. So now I will need to pull out the leftover blue jersey and cut another shirt back. And since I hate wasting cut pattern pieces, I will have to cut another back and sleeves to use up that spare front. Not very efficient. I'm afraid the two cancel each other out.
But it will be six shirts with only one thread change. That's not so bad. And my son will have all the shirts he needs for a while.
Mother Nature also decided to send a hurricane our way...or perhaps by the time it gets to my little corner of New England it will simply be a tropical storm or a tropical depression. I am expecting the electricity to be out for at least a little while, but if it isn't, I'm hoping to get that Fringe Festival top cut out tomorrow. I don't (yet) have a treadle machine, though I learned (a million years ago it must be now) how to sew on one. When I have a bigger sewing space, I expect to put one in the place of honor just as soon as I can get my greedy little paws on a old Singer like my mother's. So the electricity can go out all it wants...I'll still be able to sew.
I use Kwik Sew 2894 to make kids' raglan tees. I've been using this pattern for quite some time and I'm always pleased with the results. The only thing that I have to change is that I always, no matter the size, shorten the pattern piece for the neckline ribbing. Usually it's just 1/4 inch or so (for a full 1/2 inch shorter neckline binding), but sometimes it's a hair more. I found that this makes the neckline binding lay flat against the neck and is much less likely to stretch out with time.
Assembly line style, I cut out one of brown organic jersey, one of slate blue jersey, one of slate blue and navy striped jersey, one that I color blocked using the two blues, and one of green and brown camouflage in thermal knit. I have lots of different ribbing in my stash, so it's usually just a matter of picking the one that's the closest color match or using a contrast color for a "ringer tee".
When it came time for sewing, I sewed the camo and the brown first and then changed serger thread for the three blue ones. Four shirts with only a single thread change. I love efficiency.
But wait! That's only four. What happened to the fifth one?
Naturally, I discovered (after putting all the fabric and pattern pieces away, of course) that for the blue jersey I cut out two shirt fronts instead of a front and a back--it couldn't be two backs, couldn't it? Where I could just recut the neckline? Noooo. It had to be two fronts. So now I will need to pull out the leftover blue jersey and cut another shirt back. And since I hate wasting cut pattern pieces, I will have to cut another back and sleeves to use up that spare front. Not very efficient. I'm afraid the two cancel each other out.
But it will be six shirts with only one thread change. That's not so bad. And my son will have all the shirts he needs for a while.
Mother Nature also decided to send a hurricane our way...or perhaps by the time it gets to my little corner of New England it will simply be a tropical storm or a tropical depression. I am expecting the electricity to be out for at least a little while, but if it isn't, I'm hoping to get that Fringe Festival top cut out tomorrow. I don't (yet) have a treadle machine, though I learned (a million years ago it must be now) how to sew on one. When I have a bigger sewing space, I expect to put one in the place of honor just as soon as I can get my greedy little paws on a old Singer like my mother's. So the electricity can go out all it wants...I'll still be able to sew.
Tuesday, June 28, 2011
The Franken-Dress Finished
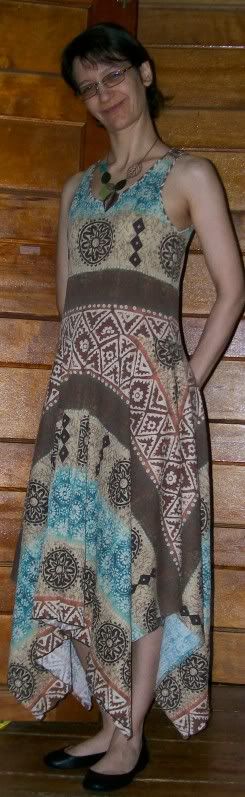
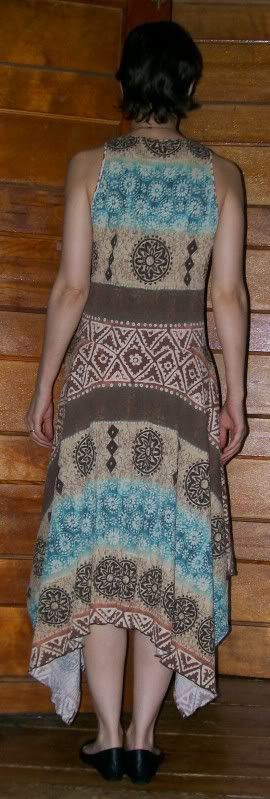
Here it is! And I love it, pretty much as I expected to. Light and airy, I can wear it with ballet flats, sandals, and I even tried it with my Steampunk airship boots (but I don't think that'll fly, so to speak). I wore it all day Saturday on an extensive shopping venture and didn't trip even once on the points while walking up stairs--a personal best :-)
So here's the details:
Having never worked with fabric quite like this one, I thought it prudent to do a bit of testing first. When I bought this last summer from Fabric.com I wasn't sure what it was destined to be, and it was on sale for $1.99, so I got 6 yards. Plenty for experimenting.
The skirt would be easy. It's the tank top that was going to give me trouble and I knew that from the outset.
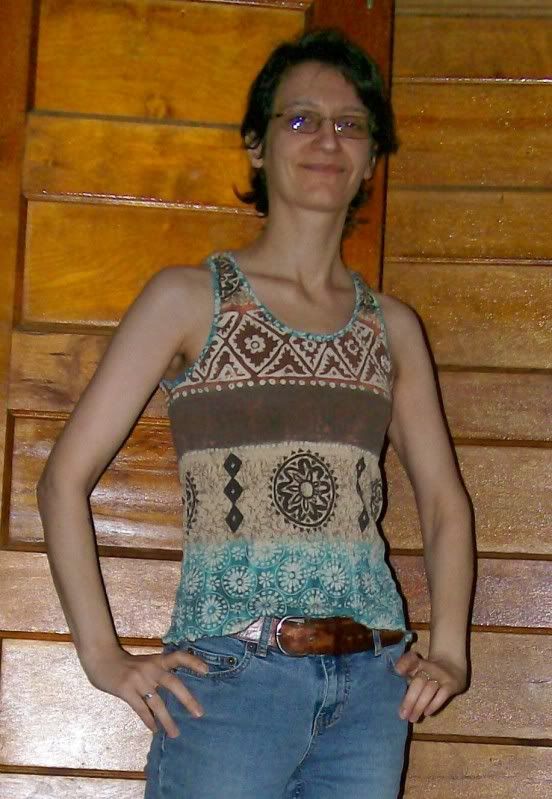
The top pattern is Kwik Sew 2517-- it's a dress pattern that I have used before for tops. I decided I really liked the look of View C, sans the mock turtle neck, so I simply redrafted the front to have a scoop neckline. That left me with no clear guide on how long the neckline binding strips should be, so Sample Tank Top Number 1 was primarily intended to give me a feel for sewing this fabric and help me to determine 1) how long the bindings should be, 2) how much I need to stretch the bindings to make sure the necklines and armholes don't gape open, and 3) how easy it would be to sew those bitty 1/4" bindings in this very crinkly fabric that wants to curl at the edges anyway. Sample Tank Top Number 1 isn't wearable, but it did answer all those questions.
Sample Tank Top Number 2 turned out perfect, I thought--until I realized that I didn't center the medallion motif properly *sigh* That was a major disappointment, because I really liked the effect of the pattern placement with the teal bindings. I put a rolled hem on this and decided to wear it as a plain tank top--chances are that no one but me is going to notice it isn't centered.
This is where I started getting a little frustrated. I cannot bear to waste things, especially fabric. And I particularly love this crinkly stuff. My only gripe with this fabric is that the repeat is so long, so that there would be a lot of wasted fabric if you're looking to use the colors and patterns as design elements. I was going to have to lose about 1/2 to 3/4 quarters of a yard to recut another tank top so that I could replicate the pattern placement of Sample Tank Top Number 2. I gritted me teeth, laid out the fabric, gathered my cutting tools...and discovered I couldn't do it. I just couldn't bring myself to cut a tank top out of the middle of a piece of fabric. So I rearranged the pattern pieces for less waste, even though it meant the blues in the fabric weren't going to be where I originally thought I wanted them.
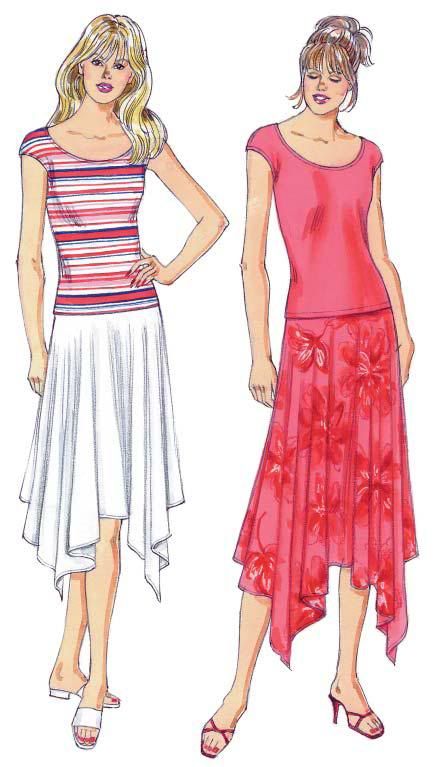
Once I had the tank top finished, the skirt was pretty quick. Kwik Sew 3242 has both a skirt and a top pattern--I've tried the top and I did not like the fit at all. The skirt I like--even though Kwik Sew's pattern envelope makes it look kind of stiff and, I don't know, sort of dumpy-looking (the drawing is great, the picture *shudder* is awful). The skirt pattern is drafted for a woven instead of a knit, so the tricky part was making sure that I didn't trace the wrong size and end up with more skirt than I could stuff into the tank top waist seam. What made it easier was that the pattern is such that the handkerchief part is attached to a yoke. I measured the bottom edge of the tank top, compared it with the bottom edge of the yoke pattern piece and traced out the corresponding handkerchief piece of the correct size. I did end up having to shorten it just a bit, though, since my fabric wasn't quite wide enough to handle the whole pattern piece. Stitching it to the tank top was a piece of cake.
What I didn't take into account is what all that fabric (and there is alot!) hanging from the waist would do to the tank top. *sigh again* The waist seam was pulled down too close to the hip line (not a good thing for me) and the armholes were pulled a little further down than I liked. There's nothing (easy!) I can do about the armholes and it's not so bad that it's unwearable, but I did unpick the waist seam *more sighs since unpicking a serged seam is not exactly fun*, cut off about 2 inches from the tank top, and reattached the skirt. That worked out nicely. I used a rolled hem on the serger for the skirt hem. I paired it with my leaves and butterfly necklace and black ballet flats (brown probably would have been better, but I don't have brown ballet flats *sadface* ) and went shopping :-)
I think this dress needs a belt or a sash or something to make it look totally put-together and complete. I'll have to think about it.
All told, this project took about 3 yards worth of 48 inch wide fabric--not including the yard I used for practice--so I still have two yards left...hmmm, I'll have to think about what I can do with those...
Wednesday, June 22, 2011
Next Up: The Kwik Sew Franken-Dress
I got a beautiful piece of cotton crinkle knit (with rows of lycra threads for permanent crinkly-ness--not exactly sure what the proper name for this stuff is) last summer from Fabric.com that I've been hanging on to since then, waiting for the perfect pattern. Well, the perfect pattern never turned up, so I decided to make my own by combining the top of one and the skirt of another--hence: The Franken-Dress *cue dramatic music here*
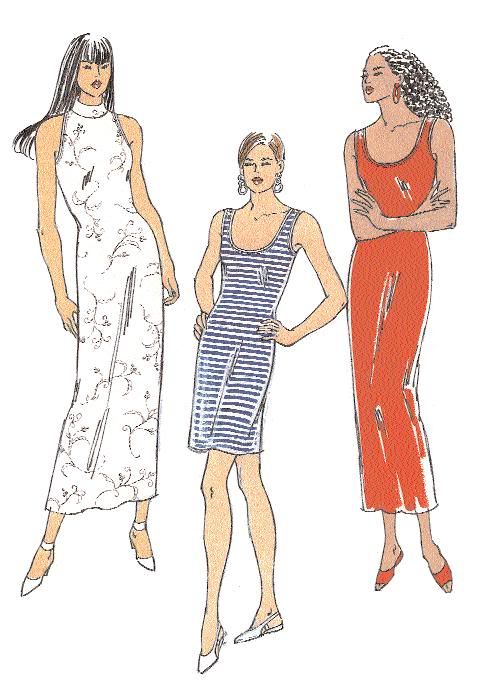
I like the top of this dress--minus the high collar--I think I'll end up using the front of View B and the back of View C. This is Kwik Sew 2517
And I like this handkerchief skirt. This is Kwik Sew 3242.
My plan is to combine the top of the first with the skirt of the second for a cool summer dress. I can use tiny 1/4" binding for the neckline and armholes and a wooly nylon rolled hem for the skirt. I like this idea. The more I think about it the more I like it : )
I like the top of this dress--minus the high collar--I think I'll end up using the front of View B and the back of View C. This is Kwik Sew 2517
And I like this handkerchief skirt. This is Kwik Sew 3242.
My plan is to combine the top of the first with the skirt of the second for a cool summer dress. I can use tiny 1/4" binding for the neckline and armholes and a wooly nylon rolled hem for the skirt. I like this idea. The more I think about it the more I like it : )
Tuesday, May 10, 2011
A Note About Knits
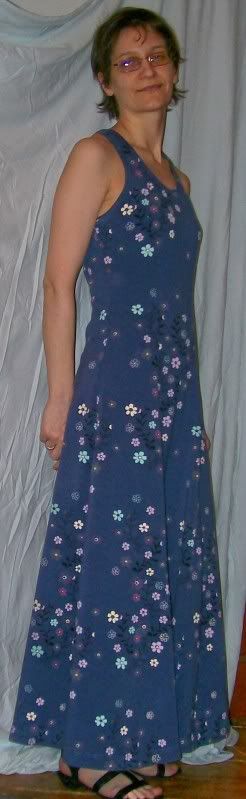
I think I prefer to wear knits over wovens. Most of time anyway. I have a giant stash of cotton and rayon knit fabrics, some with lycra and some without. This dress is made from a medium weight cotton/lycra jersey. When I bought it, it came in blue and black and I've made identical dresses with both fabrics. I originally used Kwik Sew 2517, which is a dress pattern, and adapted it into a racerback tank top. Then I added princess seams and used those to create the sweeping skirt style of this maxi dress. I like ankle length dresses and I like them with only slightly flaring skirts. It makes me look taller and at 5'2" I need all the help I can get :)
Lots of people make garments with knits on a regular sewing machine using a tiny zigzag stitch. I've seen some really beautiful projects. I must confess, though, I almost never sew knits with a regular sewing machine. I use my single needle for details on knits, but for construction I'm strictly a serger-girl. Maybe I'm spoiled. My first job as a teenager was sewing sleeves into knit turtlenecks with an industrial serger. I've never gotten over the thrill of sitting down at a machine and zipping through a seam. I got my first serger in the early '90s and I haven't been without one since. That's not to say that I don't love sewing on my regular sewing machine. Just not knits.
Sunday, May 1, 2011
Velvet and Rayon Burnout Top
A fitting first post since this picture is my current profile favorite. This overshirt is done in a beautiful silk/rayon velvet burnout that was a pleasure to work with, though the darts were tricky because of the uneven surface. The pattern is Kwik Sew 2927. Kwik Sew patterns are perfect for beginners because of their simple designs and excellent instructions, but as you can see, with the right fabric choice even a simple pattern can make a classy-looking outfit. The charcoal colored cap snap closures are virtually invisible against this fabric and the neck edge is done with a linen bias tape binding--photo tutorial coming soon!
![]() |
| Fabric Closeup-I love the metallic glitter |
Subscribe to:
Posts (Atom)