Showing posts with label jacket. Show all posts

Friday, August 30, 2013

Can You Name This Jacket?

I almost never buy clothes, but occasionally something grabs my leg and begs to come home with me.  I went to a local second hand store over the weekend and I positively fell in love with a silk and cotton jacket that I simply couldn't resist. The tag said it was from "Anthropologie", but the inside label merely says "Violet".  So does anyone recognize this jacket?  Can you tell me anything about it? 

The fabric is made with a cut-out technique that I just have to try my hand at. I'd love to make a silk vest with these kinds of hand-sewn cutouts. 

Thursday, August 29, 2013

Summer in Review -- Projects #1 & #2 of Not Very Many

It's been a busy summer for me, and while I didn't get much sewing done, I managed to get a little in here and there. I totally failed when it came to the blogging part, though, so I'll try and show you some things in the next week or two. 

First up is Daughter's handkerchief dress. She does so love these and it's a neat way to use a horizontal stripe.  I got this print from Fabric.com of course.  It's a cotton jersey that probably has about 25% stretch.  Sleeveless for the summer and she should be able to wear it through the Fall as well with a sweater. I have some pretty pink acrylic sweater knit that ought to make a warm a cozy sweater for her.


I also made this mauve jacket for Daughter this summer.  It's a very basic round-necked jacket -- I don't recall which pattern I used, though I suppose I could fish it out if anybody really needs to know.  It wasn't a very impressive pattern -- it was an unlined, faced jacket meant to worn over formal wear, like a flower girl dress or something.  I added a lining (which was so easy I don't know why they didn't design the pattern with one) which turned it into a classy little jacket instead of some cheesy little thing that looks like you made it yourself.  I added the pockets as well, since Daughter was adamant that it HAD to have pockets.  The fabric is a bottom weight stretch cotton sateen with a woven vertical stripe, originally bought to make pants for myself (until I realized that pink pants and myself are not a good combination, what was I thinking?). And since it was a pretty plain fabric, it absolutely had to have trim of some kind.  I've had this heart ribbon for a while, and it fit the bill perfectly, especially since the color matched so well.  And Daughter picked out the heart buttons during a visit to Joann's last year.  They've been languishing in the button box, waiting for just the right project.

That's two of the projects and I'm pretty pleased with both of them.


Sunday, February 5, 2012

PR Menswear Contest Day 5 and a New Project

Almost finished with my son's shirt.  All that's left is to sew the buttonholes and sew on the buttons.  Five days from beginning to end is not bad.  Not bad at all.

What I'd like to make next is this coat from Orvis.  I just bought some awesome 50%wool/50% acrylic olive green suiting from Fabric.com (sadly out of stock, but I got 10 yards, woo hoo!) that is perfect for this jacket.  I also have a stock of leather scraps in a couple different shades of brown, so I should have all the supplies on hand.  What I haven't been able to locate are those cool bone buttons -- I'm probably going to have to compromise on those.

I have two Burda patterns that I'm going to morph into this jacket.  Burda 7704 and Burda 8186. 

I'll use 7704 for the collar (which I'm going to have to widen and shorten) and the patch pocket placement (and therefore the seam which I think those front pockets are sewn into).

And I'll use 8186 for the breast pocket placement (and therefore the placement of the leather shoulder patches), the bottom front hem and the back vent. 

There's no back view of this jacket on the Orvis website, but it looks like there's a back yoke as well.  For that part, I'm going to have to wing it.

I'm not sewing this coat for the Men's Wear contest -- I really don't think that 10 days is nearly enough time to tweak the patterns, make the muslin, and sew the coat.  Well, not without completely ignoring the rest of my life, anyway.  But, of course if by some miracle it does get done before the deadline, well...

I washed the wool today, and it is now hanging to dry.  So it's on to finishing the shirt.  I've reviewed this shirt already, so then it's just a matter of taking a pic, editing my review, and submitting the entry to the contest.  Yay!  I actually did it!

Monday, January 9, 2012

Boys' Jacket--Burda 9533


It's been a busy week, so it took me this long to find the time to sit at my computer and do the write-up for this project.  Here goes:


The pattern is for a semi-fitted boys' jacket or vest.  I made the jacket in a US size 9, European size 134.  The idea was to make him a classy jacket that would keep him warm in New England winter.  I think I achieved that.


The pattern calls for cotton, sweatshirting, gabardine, or corduroy as fabric suggestions, but I got all creative and used a toasty warm wool melton that I got from Fabric.com a couple of years ago.  Youngest Son picked a teal-ish Catalina shirting for the lining.  Not my first choice, but actually an excellent one.  He might have better taste than I do.


There's a number of really neat things about this pattern.  There is not only a back yoke (that's used for shaping), there's also a front yoke (as a design detail.  Two extra seams, but it's very nice-looking.

The patch pockets and pocket flaps are lined with the lining fabric.  Very cool.  I imagine it wouldn't be that difficult to do self-lined pocket flaps if I were doing this in a lighter weight fabric, but for the melton, this idea is downright brilliant. 

My topstitching of the patch pockets could be better, but as they say, it passes the 20 mile an hour test.

The undercollar is also of the lining fabric.  Seriously, I love the idea of using a cool lining fabric and then also using it to accent the fashion fabric.  Especially with boys' clothes.  It's always so hard to make them stuff that isn't boring.

The knit cuffs are also an interesting design feature.  They are attached to the lining first and then attached to the sleeve.  Made with ribbing, they stretch to fit over gloves.  If I make this one again (a distinct possibility as either a light jacket in Spring or another winter coat next year or maybe even both) I will make the cuffs a little smaller so they're a bit more snug around the wrists.


The sleeve patches are a bit odd, though.  I originally thought they were elbow patches, but the placement diagram on the pattern pieces puts them on the outside of the arm.


I think they're just supposed to be decoration.  I used black sheepskin leather for the patches, just topstitched along the edge with a leather needle in my treadle machine.


I used another piece of leather for the loop at center back.


The pattern calls for only three buttons, as the jacket is supposed to have lapels and a roll line.


However, for warmth, it really needs a top button.  So I placed a top button and slightly adjusted the placement for the rest of the buttons.

Hmmm.  Doesn't look as good buttoned all the way up, but if it's that cold out, looks is a secondary consideration.


I left out the shoulder pads as they seemed unnecessary, but I would include them in a Spring version.  They would definitely lend a tailored look to a jacket that already looks pretty sharp.


This is a really nice pattern.  Technically, it is very well drafted.  All the notches fit, the sleeve cap has a perfect amount of ease, the proportions are just right, and it fits nicely.  Highly recommended.

Saturday, November 5, 2011

The Fall Jacket -- Finished At Last!


Yay! It's Done!

I'm so happy with this finished jacket and so pleased that it turned out so well.

I've only ever used a couple of Butterick patterns and I've been pretty happy with them --  it could be that the other Buttericks I've sewn have been loose-fitting and the normal issues I have with patterns just haven't come up.   Or it could be that for whatever reason their draft fits me right out of the envelope.  I ordinarily have to spend quite some time narrowing the shoulders and doing small bust adjustments.  Not so with the Fall Jacket.


Butterick 5685 and wool blend fabric

The pattern is Butterick 5685 and is designed for lightweight woolens, tweeds, or poplins.  I used a very nice 30% wool woven that I picked up at JoAnn's (an amazing find since my JoAnn's almost never has wool or silk) with leaves embroidered in rayon.  It sewed up beautifully -- a real joy to work with.  My only regret is that I have just a yard or so left.  On the other hand, the fabric is so distinctive it may not be a good idea to have too many articles of clothing made from it.  Hmmm. I think there's enough left for a vest, though...

First muslin -- this project
only needed one


The muslin, sewed right from the tracing, fit beautifully right from the get-go.  The only thing I tweaked was I trimmed 1/2 inch from each front to narrow it up a bit.  It pulled in the princess seams just enough so that their placement was more to my liking without really disrupting anything else in the jacket.  The sleeves are very nice with an excellent amount of sleeve cap ease -- enough for good fit but not too much to make assembly a nightmare. 
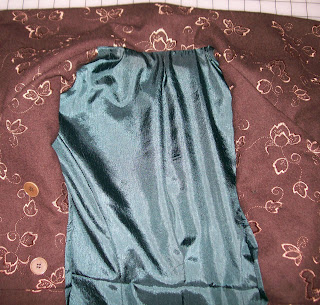


poly spruce -- I like the green and brown combo


The lining is a sort of spruce-colored polyester.  I bought half a dozen yards or so of this last year for making linings and I really wish I'd bought more.  Actually, I think I bought what was left on the bolt, so maybe I mean I wish there had be more for me to buy  :-)

Anyway, it makes a fabulous lining, with just the right amount of slipperiness for sliding over sweaters.  In fact, I was a little concerned that I made the jacket too small at first -- trying on just the shell dragged so much against the t-shirt I was wearing that it made the jacket feel very snug.  Horror!  Doom! Despair!

Then I slipped on the lining, and then the shell (the two hadn't been joined yet) and I couldn't believe how much roomier the jacket felt.  Behold the Power of a Polyester Lining!


I used woven fusible interfacing for the fronts and plain muslin as interfacing for the collar.  I trimmed the seam allowances of the interfacing before fusing to reduce bulk.  This really helped to make the corners nice and sharp when turned.


The shoulder pads are 1/4 inch instead of 1/2 inch like the pattern calls for and I certainly did NOT extend the outer edge 5/8 inch past the shoulder seam.  That's the aforementioned dreaded linebacker shoulders and I am so not going there. I bought these at JoAnn's yesterday since I decided I was too lazy to dig out the appropriate supplies to make my own.

So, I have mostly good things to say about this pattern's draft.  I should mention, however, that it is important to sew all the seams from the top down, as l discovered that the pieces did not all quite properly match at the hem.  The fronts in particular were shorter than the sides and back, so I ended up trimming a bit to even everything up.  I'd suspect sewing error except that the same difference occurred when sewing both the lining and the shell.

As for the instructions.  They're terrible.  At least in my opinion.  I read through them several times, at first to get a feel for the construction, and then to try and figure out why the heck they would put this jacket together the way they did.  I got the first, but I'm still baffled by the second.

The instructions have you sew the upper half shell and lining together, then sew the lower half shell and lining together, and then join the two at the waist seam (sewing the shell seam and slip stitching by hand the lining seam...ummm...sewing by hand, Butterick?  I think not).  After that, you get to fumble around a bit trying to put the sleeves and shoulder pads in while trying to keep the lining out of the way because hey! the lining sleeves are SLIP STITCHED IN BY HAND!!!  Need I say more?

What I did was first assemble the shell (all of it, including the sleeves), then assemble the lining (also including the sleeves), and then join the two along the front and neckline seam.  So simple.  So easy.  I can't for the life of me figure out why Butterick made it so damn complicated.

I stitched the cuffs differently as well, and I sure do wish I had done the buttonholes differently, because I really don't like them as they are.  It might not be too late to fix it, but I'm not going to do it right now.


The cuffs call for turning up the shell fabric over the lining and stitching the hem.  I pulled both the shell and the lining fabrics inside out between the shell and lining layers, placed them right sides together and sewed them together at 3/4 inch seam allowance.


Trimming the lining would have kept it
more firmly inside the sleeve
I should have trimmed the lining about 1/2 inch as this would have guaranteed that the lining would stay inside the sleeve when the jacket was slipped on, but this is a minor issue and one I'm not going to worry about.


The buttonholes are placed on the edges of the jacket both on the inside front layer and the outside front layer.  This means that the inside layer gets buttoned awkwardly and I don't like it.  It also means there's buttons on top of each other on that side -- the inside functional ones and the outside decorative ones (I couldn't figure out at first why the pattern called for 6 buttons...).  I will likely sew shut the buttonholes on that inside layer and put buttons there while putting two button holes near the princess seam on the outside layer so it's not so clumsy to button the jacket closed.

Now for the oddities.  I call them oddities because  I refuse to call them mistakes :o)

Not sure how this happened
but I intend to find out
The collar.  Note that mine doesn't extend all the way to the edges of the fronts like in the drawing on the pattern envelope.  There is exactly a 1 5/8 inch extension beyond the collar.  On both sides.  Except that when I walk the seam lines on the pattern paper, the seam lines match edge to edge.  And I staystitched the neckline of both the shell and the lining.  I'm going to sew this baby again just to see if I can duplicate the phenomenon.  I really want to know what happened there.

In any event, I actually like it better this way.  Somehow, I think it suits me more.  What I don't like is the button placement.  Because I used the pattern guide for buttonhole placement which plans on that corner being turned down a bit, the buttonholes are too far away from the edge and the top.  I sewed a small snap to the corner there to keep it from flopping around -- not the ideal solution but one that is good enough.


A good way NOT to do a hem
The other "oddity" is the hem.  You can't see this oddity, but I know it's there.  It will bother me for a while, but I am determined to ignore it :o)  I wanted a nicely finished hem, so I folded polyester organza ribbon over the edge and stitched it down like seam binding.  Bad idea.  Bad, bad, bad idea.  It would have worked if the hem had been straight.  But it wasn't.  When I folded up the hem along it's slight curve, the ribbon bunched up and rippled and generally made a nuisance of itself.  And it's too stiff.  I highly recommend against using poly organza ribbon as a seam binding.  I know I won't do that again.

Even with it's quirks, I absolutely love this jacket.  I tested it out last night for 15 minutes at 30F degrees -- it's a little too light for that temperature but should be perfect for 40F - 50F.  New England daytime Fall temperatures.  Exactly what I had in mind. 

I think this jacket is a great draft.  It fit beautifully all over and the sleeves didn't not have enormous amounts of sleeve cap ease.  While I don't need more than one jacket with a collar like this, I think I will use this pattern again after I find another collar for it -- it makes a really nice double breasted jacket.

Sunday, October 30, 2011

Progress on the Fall Jacket

Despite the fact that we got 18+ inches of snow last night, we weren't one of the unlucky ones to lose power.

Which means I was able to spend some time today working on the Fall Jacket -- Butterick 5685.

Yesterday, I got all the pieces cut out.  Doggone it! This jacket has A LOT of pieces, between the fashion fabric, lining and interfacing.

Today, I got the lining sewn (because I always sew the lining first) and the fronts and collar interfaced before I started making mistakes.

Like sewing the right side of the collar to the wrong side of the under collar.  And trimming the seam allowances before I noticed. *sigh* I cut another collar.  Good thing I had a whole 1.25 yards extra fabric.  After an embarrassingly long time, I finally got the collar assembled.

Then I immediately proceeded to sew the wrong side of the side back to the right side of the back.  That's it.  I quit for tonight.

Tomorrow is another day :o)

Friday, October 28, 2011

Fall Jacket Muslin -- and It Fits!

Muslin for B5685 Size 8
Not a bad fit.  Not a bad fit at all.  Especially considering that the muslin is made of, well, muslin, and the actual jacket is going to be made from a light to medium-weight wool.  With a lining.  And lots of interfacing.  And a collar.  And... well, you get the idea.

After this, I may become a Butterick believer.  I've never had a pattern fit this well practically right out of the envelope.  All I did is shave about 1/2 inch off the front edges (cheating, I know, but it brought in the princess seams just where they needed to be without messing up anything else).

The sleeve cap, for once, doesn't have a ton of ease.  In fact, it has just enough to make room for the very modest shoulder pads.  I never did get that linebacker look -- I remember the '80s all too well.

Please, do try to ignore my hasty and sloppy seaming of the aforementioned sleeve seam -- this is just a muslin after all.

And look at how nicely that sleeve hangs.  No weird wrinkles, no need to rotate the sleeve, no nothing.  I think I'm in love.

I say that now, of course.  Before I've cut into the good stuff.  We'll see whether or not I have a change of heart after that.

Wednesday, October 26, 2011

Fall Jacket is Coming Together

...one step at a time.  It took a while, but I finally got all the pieces of Butterick 5685 located and traced.  It didn't help that I traced out the front for a D-cup before I quite realized that this was a multi-cup pattern, so I had to retrace that piece.  Luckily I saw it before I started cutting muslin fabric.

So, hopefully, I'll get started with the muslin for this is the next day or two.  I'm expecting some fit issues (aren't there usually?) so a muslin is a must.

Wednesday, September 21, 2011

A New Sleeve Board and Other Goodies

I went to Joann's yesterday and picked myself up a sleeve board to replace the one I smashed to smithereens (okay, okay I just broke it in half) over the weekend.  Lo and behold, the ones at Joann's are now made with steel mesh like a regular ironing board, as though daring me to try and break this one.  Ha!  Ten bucks says I can find a way to break steel mesh  :-)

More surprising was my fabulous Red Tag find.  Red Tags are 50% off this week, and I've been known to find some really great pieces for, um, really cheap.  So, I scoured the Red Tag rack yesterday and found this:

The label said 64% polyester, 29% wool, 7% other.  Um, wow.  29% wool fabric at Joann's?  My Joann's rarely carries anything in silk or wool or any of the other finer fibres.  So, I snatched it up.  I took the rest of the bolt--only 3.5 yards or so, but plenty for me to make pretty much whatever I want.  It was $10 a yard--at 50% off it was $5 a yard.  It feels really soft and the rayon embroidery is a little subtler than the picture--you know how rayon catches the light.  And I like the embroidery because it's more like vines and leaves and less like flowers--I'm not that much of a flowery kind of gal, but vines and leaves suit me just fine.

Butterick Patterns are also 99 cents this week, so I got a handful of new patterns, too.  I'm going to use this fabric to make Butterick 5685.

But not until I get a chance to make that Shining Star Vest, darnit.  Practical. Sewing. Keeps. Getting. In. My. Way.


I also got some pin cord, linen, lightweight twill, and rayon challis to make shirts for my sons and husband...but those are boring and I won't go into them  :-)